Make your creative dreams come to life with free needle felting tutorials, downloads, tips, ideas, and inspiration. Start your needle felting journey today!
The nations favourite bird, and mine. Here’s a quick a quick needle felting tutorial on ‘how to’ make a wing for your needle felted birds; scroll down for video tutorial. This tutorial is for my Robin but you can adapt this for any bird. It is super easy and, before you know it, you will have a pile of wings just waiting to be stuck to a body.
You can choose a smooth, or rough finish finish; I prefer a looser more rustic look but the perfectionists, like my daughter, would be horrified at the thought so just go with whatever you’re happy with.
Please follow the written instructions and the corresponding photograph numbers. You don’t need much wool at all for each wing and after one or two attempts you will be flying… Aah come on; someone had to say it!
HAVE YOU JUST STARTED NEEDLE FELTING?
Needle felting kits are a great way to get started and contain everything you need to make this gorgeous robin.
NEEDLE FELTED WING IN 7 EASY STEPS
1 Make a rough paper template as a guide (approx 6/cm) or just ‘draw’ a teardrop shape with your needle. With your hands, blend a thin layer of brown, dark brown and a little orange (or whatever colour you choose) and lay on top of your foam block. Lay the template on top of the layer of wool. Use your needle to draw a rough shape around it; poke the needle straight up and down all the way around your template.
2 Remove the wing template and go over the lines you have drawn again; not too deep into your foam block.
3 Fold in the sides and felt gently, following the line of the shape you have created
4 Keep turning and felting until it is firm and holds its shape Tip: It should be firm but not bulky
5 Hold the sides of the wing and create a curve by pushing the needle gently and repeatedly along the top centre, being careful not to poke your fingers. Always keep your needle straight or the tip will break!
6 If you want to you can tidy the wing around the edges by pulling the edges over and felting some more. Keep turning and repeating until you are happy with the overall shape. Repeat the procedure for your second wing.
7 Decide how you want your finished wing to look; you can fold the end over for a tidy finish or leave it loose.
VIDEO TUTORIAL
Grab your wool and felting needles and felt along with me.
START WITH A NEEDLE FELTING KIT
Needle felting kits – including this fabulous robin – are available on the website and Etsy. it is a great way to start needle felting as all the wool, tools, detailed instructions, templates, size guide and photographs are included.
I am often asked how to use wire for needle felting, and is it even needed? The short answer is no. In fact I rarely use a full wire armature because I like a firm felt. However, using wire in specific areas can really help you create the shape you need, and create more detail and dimension.
WHEN SHOULD I USE WIRE FOR NEEDLE FELTING?
Use it in the neck of a sheep so you can pose the head, or the horns and tail of an animal to create great shapes. If you want super thin legs or arms then wire is a great solution. Alternatively, make limbs around a BBQ skewer (the ‘farmers friend’ of needle felting), to create smooth legs and perfect symmetry in super fast time. Using the BBQ skewer as a tool negates the need for using wire altogether for many projects.
USING A BBQ SKEWER WILL CHANGE THE WAY YOU NEEDLE FELT!
Parsley, the needle felted hare seen below has no wire anywhere. This gorgeous needle felting project was made, almost entirely, using a wooden BBQ skewer. I started using this method back in 2017 and it has made teaching needle felting, and creating projects, so much easier!
Watch the video tutorial, at the bottom of the post, from our Friday night felt along on the FACEBOOK GROUP, or follow the mini tutorial below, and you will be amazed at how professional the finished result is, even if you have never needle felted before!
Happy Felting!
HOW TO NEEDLE FELT FIRM LEGS WITHOUT WIRE – QUICK AND EASY TUTORIAL
Scroll to bottom of the post for the video tutorial.
Make Time: Super fast! Approximately 20 minutes for both legs plus faffing time…
The needle felting kit and pattern are available via the links below and you can join the new FACEBOOK GROUP HERE
LOOK, NO WIRE? Making Perfect Legs Around A Wooden BBQ Skewer
As I mentioned, if string is a ‘farmers friend’ then a wooden BBQ skewer is most definitely a ‘felters friend’. Never be without one as it will change the way you needle felt, drastically reducing the chore of hours spent smoothing and shaping.
This is super easy, but technique is important and you may have a couple of false starts as the legs need to be kept tight and narrow, but that’s ok. Just unravel and start again. When finished they will be firm and smooth and the last couple of centimetres will be built up for the feet/paws. TOP TIP: Remember to keep the top of the legs very loose as they will be attached to the body and should look like they are part of the finished project, not just stuck on.
Let’s get going!
1 Select a length of carded wool or wool top/roving and split down the middle. This means that both legs will use equal amounts of wool and sizes will be more or less the same.
2 Start to wrap the wool tightly around the skewer, starting close to the top of the stick. TOP TIP: Keep the wool flat between your thumb and finger so the wool doesn’t twist and become lumpy and uneven.
3 Keeping the wool tight, continue for a little way then stop and felt around the entire area to secure. TOP TIP: Work at a diagonal angle around the sides of the stick keeping hold of the wool so it doesn’t become loose. If it does, unwrap and start again.This will also avoid bending or breaking the needle.
4 Continue with the process until the leg is approximately two thirds of its final length (you will see why when you remove it from the skewer) and add more wool to the foot to widen it. Continue to felt and shape the foot until it is firm. TOP TIP: A foot/paw that is significantly bigger than the rest of the leg will have more impactwhen your project is finished.
5 Remove from the stick and felt a little more but avoid the top of the leg as this needs to be kept loose for attaching to the body. TO TIP: Don’t worry if the shape is not perfect as you are going to fix that in a moment.
6 You are now going to roll the leg firmly in your hands to firm and smooth it, which will also lengthen it. When you do this keep the top of the leg sticking out, so the wool remains loose. In just a few seconds of firm rolling you will see how the leg has really firmed up and become even smoother without the need for any wires. TOP TIP: Don’t over roll it as it will become longer than needed.
Here’s what some of the fabulous Facebook group made during the live workshop! It’s a great technique that can be adapted to almost any project. Join the group HERE and come along to the free live events.
I was blown away by the quality, personality and individual styles of the projects from the FACEBOOK GROUP members and the amazing feedback has been so good!
VIDEO TUTORIAL – Felt along with me!
Watch the full tutorial and felt alongside me, workshop style.
NEEDLE FELTING ISN’T HARD, BUT STARTING A NEW CRAFT CAN SOMETIMES FEEL A LITTLE DAUNTING
When someone tells me they can’t needle felt, or tried and failed, I can say with absolute confidence that it has nothing to do with ability. In fact, the two most common reasons why people fail at needle felting is lack of confidence and trying to run before they can walk. I really hope after reading this you will be able to start your needle felting journey with a newfound confidence, and enthusiasm.
ENTHUSIASM – It’s all you need to get started; if you have that then you are 75% of the way there. The other 25% is learning the basics first. Once you have done that (and it doesn’t take long at all) you can then start to build towards (in a realistic way) those wonderful projects you have seen on Pinterest. Nobody shows up anywhere with a set of skills already in place, be it learning a new language, instrument, crafts etc. Almost everything we do has to be learned, and practiced to become proficient. Think back to when you learned to tie your shoe laces. It seemed so hard at the time, but soon you didn’t need to think about it. Needle felting is no different, in-fact it’s easier because there are no tricky patterns, or awkward knots to fathom.
DON’T SET UNREALISTIC EXPECTATIONS OF YOURSELF – Do you know of anyone who has achieved anything without some degree of effort. More to the point, what would be the point in starting out at the top of our game. As humans are programmed to set goals, strive to improve ourselves. Imagine what a boring world it would be if we all suddenly woke up to find we could get to the top of Mount Everest, be proficient at guitar playing, build a house, type a hundred words a minute…
START WITH THE BASICS– The best way to start is with simple shapes that will become part of a whole. In just an hour – yes, you heard that right – you will be able to learn how to create simple shapes, use your felting needle, and attach parts together to complete a project. This hare is one of my most popular beginners projects. Click the button below to learn how to needle felt simple shapes; the start of your felting journey.
TOP TOP TIP – ALLOW YOURSELF TO BE A BEGINNER! It’s often hard to find your confidence when you start needle felting, even harder if you haven’t done any crafting before, so tackling those fears is the first hurdle. The second hurdle is finding a good tutorial and materials guide that will give you the best chance of success. I can help with both of those things but you have the most important job, and that’s allowing yourself to be a beginner. And, as sure as eggs is eggs, if you don’t allow yourself a period of ‘learning’ grace you are setting yourself to fail. In fact, you have to get it wrong in order to succeed and believe me, when it comes to needle felting success comes very quickly.
FEAR OF FAILURE – TIME TO CHANGE THE NARRATIVE
We are, so often, our own worst critics, and we use it as self preservation technique so we don’t have to start something i.e. a new craft. We literally talk ourselves out of it before we have even tried. It is like a fail safe but it can be very self destructive. So, time to change the narrative and, when you think to yourself, ‘I’ve failed’ simply change the statement to ‘I have learned’, and see how that self doubt just falls away. Each time you do this your confidence will grow, as will your skill set. Changing the mindset, that makes you way too hard on yourself, is the most important thing you will learn when it comes to starting a new craft, and that confidence will also find its way into many other aspects of our life.
This Calla Lily looks so realistic you would think it had taken months of practice. Not so! It is made using very simple techniques that any beginner can manage. If you fancy trying it then click below to watch the free tutorials and grab the materials list.
We often spend so much time worrying what others will say and, the truth is, they will probably be super impressed that you are learning a new skill. If not then the problem is probably their own self confidence and lack of courage to try something new themselves. Ask yourself who you are doing it for? The answer should always be you! If you really struggle then don’t show your felt creations to anyone until you feel ready, and then not at all if that is how you feel.
CRAFTS ARE SUPPOSED TO BE FUN…
Always remember, you are doing this for you and no one else. Crafts are all about you, and the enjoyment of just making, so try and loose yourself in those creative moments.
NEVER COMPARE YOURSELF TO OTHERS!
Be realistic and always remember that they started off exactly the same way as you…as a complete beginner! If you are on chapter 1 and they are chapter 5 then it’s hardly a fair comparison, and it’s a sure fire way to ruin your day, and knock your confidence at the same time. Find your needle felting feet, learn the basics well, then start to look for inspiration. Also, it is completely normal to think ‘I will never be able to make that’. Honestly, time and practice will change your mind.
DON’T UNDERESTIMATE THE MENTAL HEALTH BENEFITS OF CRAFTS
Anxiety, loneliness, isolation and depression have never been more prevalent than they are in today’s society, and with good reason; a global pandemic, climate change, rising prices, job insecurity, fear for our kids, caring for others, the list goes on and on… But, amidst all of that, the world is still full of great people and creativity. If we just prescribed ourselves some craft therapy on a regular basis then everything will feel calmer, more grounded, safer. And, if that is just for the time you are involved in something that distracts you from the daily stresses and strains it will allow you to go about your day in a much better state of mind.
IT DOESN’T MATTER WHAT YOU DO AS LONG AS YOU DO IT
If not needle felting then a jigsaw, sewing, growing house plants, gardening, reading, knitting, colour by numbers, in fact anything that requires your undivided attention. Even though it can be hard it is so important to create a little time to focus on yourself, even if only for half an hour. And fortunately needle felting is incredibly portable so, if you can’t find a quiet space or the household won’t leave you alone, I have often found the loo to be a good alternative. As I said, needle felting is very portable 😉
ARE YOU READY TO START NEEDLE FELTING NOW?
Let’s get going. The video tutorial below is an introduction to creating a really simple shape that will become the most important technique you will learn when first starting needle felting. It can be made in just 5-10 minutes and will act as the structure, or scaffolding for the rest of your project. My tutorials are very workshop style and are the nearest thing to one of my in person classes. Simplicity and speed are the cornerstone of all my tutorials and I am always looking for new techniques to help improve your needle felting journey as well as give you the confidence to fall in love with this craft as much as I have. I have added links for the playlist that will teach you how to complete hares, sheep, mice, foxes, badgers, gnomes and too many to mention, with ease. You just need to be enthusiastic and willing to learn.
Click HERE for my quick do’s and don’ts guide to needle felting.
NEEDLE FELTING VIDEO TUTORIALS – BEGINNERS PLAYLIST
MAKE ALL THE NEEDLE FELTED THINGS!
Needle felted hares and sheep are always popular for beginners, needle felted gnomes and pumpkins can be made in just 30 minutes, and why not rustle up a macaron or two in just 15 minutes! Needle felting ideas and tutorials are endless so checkout the menus at the top of the page and make all the needle felted things!
Helping you create perfectly shaped, firm needle felted projects that a more experienced needle felter would be proud of!
Your ears have pricked up now, haven’t they? Well, I have used ALL the needle felting tools over the years and I still end up using just a handful on a regular basis. However, a few years ago I discovered the magic of the humble BBQ skewer and it changed the way I needle felted?
Now, to some of you this will be old news but to many, especially those new to needle felting, it will become a revelation! A needle felting epiphany of sorts, and you will wonder how you ever managed without it, even though it was sat in your kitchen draw the whole time. Even better, total cost, only a few pence or cents, assuming you bought them as a multi-pack.
The BBQ skewer is, to needle felters what string is to farmers and, once discovered, you will use it as your go to felting tool. It will give you the confidence to try new styles that you may be finding tricky with your current technique. You can also use any wool, be it carded or wool tops.
For instance, the legs , head and body of this fabulous hare (link for tutorial below) have all been made around a BBQ skewer, and not a wire in sight! And, believe me, those legs are long! Wherever possible I like to work without wire so this works well for me. Even when I use wire for animals it is usually just for the legs, and maybe the neck. That said, if you are working much bigger then you will find using wires really helps form and stability.
What this magical wooden stick allows you to do is to create perfect symmetry for your legs in super fast time. They end up really firm so no floppy, saggy legs (not a good look) and no need for wire. Making firm, perfectly shaped heads is a dream and lengthening and tapering the body shape is a breeze.
From hedgehog noses to Christmas trees, gnomes, mushrooms, cactus, bumble bees and bunnies… the list of things you can create is endless, and even the snail shell was made around the skewer. Mind boggled yet?
Make super fast and simple balls, bunnies and bees. Felted balls only take 3 minutes and these little projects are perfect for using scraps of wool. Now it really is boggled isn’t it? 😮
Now go and dig out your BBQ skewers and have some needle felting fun. If you can’t find them they will probably be at the bottom of your kitchen drawer, covered in a sticky substance of unknown origin 🤢
Become a VIP Felt Club member! It’s free and you will receive a free needle felting pattern, lifetime discount code, exclusive early access to new product launches and promotions, as well as notification of new tutorials and live needle felting workshops!
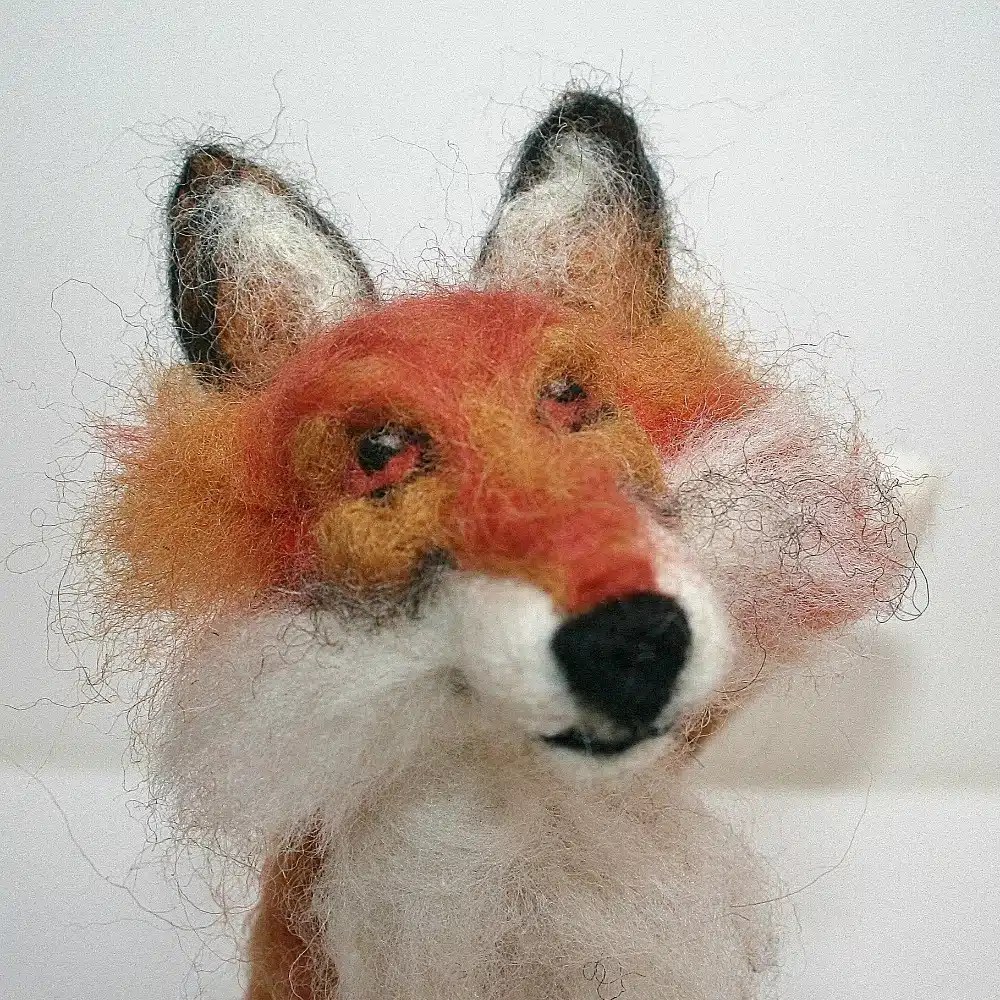
Mastering the technique of adding depth and dimension to these tiny features can elevate your creations from good to exceptional. And, achieving this level of realism is easier than you might think!
One effective method to enhance the realism of your needle felted animal eyes is by focusing on the eyebrows. By simply incorporating a small seed shape of wool above the eye and gently felting it into place, you can create subtle yet impactful changes. This addition not only adds dimension but also brings the eyes to life, making them pop.
The beauty of this technique lies in its versatility. Whether you prefer a subtle enhancement or a more dramatic effect, adjusting the size and shape of the eyebrow wool allows you to tailor the outcome to your liking, and project. Experimenting with different styles and blending colors can yield fascinating results, allowing you to customise your creations and infuse them with personality.
Take, for example, the fox eyebrows showcased here. Also, by blending lighter and slightly darker hues, we prevent them from blending into the face and ensure they stand out. This simple yet effective tip can make a world of difference, transforming your needle felted animals into captivating projects.
So, the next time you embark on a needle felting project, don’t overlook the importance of the eyes. With a little creativity and attention to detail, you can breathe life into your needle felting projects. Experiment, explore, and let your imagination guide you – the results may surprise you!
Roll a small piece of wool into a seed shape by rolling in the palm of your hand with your forefinger
Gently felt in place just above the eye
START NEEDLE FELTING TODAY!
If you already have the needle felting wool and tools you can quickly download from a range of 60 different patterns HERE
ARE YOU A COMPLETE BEGINNER TO NEEDLE FELTING?
Then you will love these tutorials to help you get started with confidence:
Adding long fur to needle felted animals adds serious impact as well as adding another element of realism. I have had a lot of requests asking how it’s done and the technique is so easy that even the most nervous beginner will be able to tackle this with ease. Once learned, this technique can be used for so many other animals and projects.
USE THIS TECHNIQUE FOR ANY ANIMAL
Scroll to the bottom of the post for the video tutorial, and see how I created an amazing topcoat for my Highland cow!
YOU WILL NEED:
Any medium to coarse wool top.
Standard felting needle – 36 or 38 gauge are good all rounders.
Foam pad or felting mat to support your project.
Sharp scissors.
TIME TO MAKE
Adding wool top and trimming: 20 minutes
Faff time: how long is a piece of string?
WHAT FELTING WOOL SHOULD I USE?
For full, flowing effect use a wool top for long coats, also known as roving although this isn’t strictly accurate. Carded wool can be used but you just don’t get the same results as the fibres are much shorter and run in different directions. As I am making my favourite, the Herdwick sheep, I have used Herdwick wool top but any medium to coarse wool top will work just as well. Herdwick wool top is very coarse, and sheds a lot so is not entirely suitable for all aspects of needle felting. However, for this application it is perfect and the earthy texture is just what I am looking for.
Herdwick Sheep needle felting kits are available on the website HERE
Lets get creating! Visit the homepage HERE for full list of tutorials
SEPERATE THE WOOL
1) Your ‘naked’ sheep is prepped and ready for it’s top coat. To make this sheep follow the basic shapes video tutorials HERE.
2) If your wool top is quite thick then split it down the middle before starting
1 & 2
3) Cut (or pull) a strip of wool approximately 10cm long, but longer if your sheep is larger than mine which is 9cm from feet to top of its back. Please note: this is one of the few times it is OK to cut wool as the cut ends will not be attached to anything. TOP TIP: Cutting wool for needle felting is generally a no no as it damages the fibres, and prevents them from felting. If you do need to cut a piece away from your needle felting project (head maybe too big or legs not firm enough) make sure you wrap it in fresh, uncut wool before re-attaching.
START ATTACHING TO YOUR ANIMAL
4) Lay your strip of wool on the bottom half of the body of your sheep.
3 & 4
5 & 6 ) Felt across the centre of the strip of wool to keep it in place. Make sure it is firmly attached as you don’t want it to pull away when handled.
5 & 6
7 & 8) Fold the top over to double the thickness
7 & 8
9) Felt along the top to keep it in place.
Fun Herdwick fact: Herdy’s will climb up to 3000ft to graze on the Lakeland high fells, and are fondly known as the ‘gardners’ of the Lake District.
10) Repeat this process around the sheep until you have created a ‘skirt’. Trim around the bottom of the skirt so that the legs are visible and the wool is an even length all the way round.
9 & 10
11 & 12) Repeat steps 1 to 10 and create a second skirt approximately 1 to 2 cm above the first.
11 & 12
13) Once the second skirt is complete lay a strip of wool across the sheeps back.
14) Felt down the centre of the wool strip to secure it. Repeat once or twice more until the back is covered.
13 & 14
15 & 16) Skip this part if your sheep doesn’t have a neck. Add much thinner strips of wool around the neck but leave the top part of the neck visible.
15 & 16
TAME THAT MANE!
17 & 18) Your sheep is looking a bit wild so smooth it down with your hands.
19) Now you have flattened the wool it is looking a bit chunky so time for a trim. You can also snip into it, hairdresser style, to thin it out and give it some layers. TOP TIP: Take your time as you can’t stick it back on once you have cut it and you don’t want to end up with bald spots.
20) Give it a gentle shake to get rid of any loose wool. TOP TIP: You may want to do this outside or in a bag to avoid lots of fibres flying everywhere.
19 & 20
21) I quite like the wild look but, if you want to go for the more traditional then just smooth the coat down and fluff gently with the tips of your fingers.
ADDING THE HERDY ‘BUZZ’ CUT
Now, depending on the sheep you have created you may just want to leave it at that. However, the Herdwick sheep sport a pretty nifty ‘buzz’ cut so continue to the next section to see how it’s done.
21
22) Lay a thin strip of wool across the top of the head
23) Secure by felting across the centre of the wool strip, making sure the eyes are still visible.
22 & 23
24) You now have something of a troll situation going on.
25) Trim quite close to the head, being careful not to snip into the ears.
24 & 25
26) There you have it. Your sheep in all its long coated glory, ready for even the harshest of Cumbrian winters.
So you have spent hours making your fabulous needle felted sheep, only to realise you don’t have any curls to finish it. Grrrr! Not to worry, just grab a ball of wool, yarn or similar and make your own. It’s really easy and creates a whole new look for your needle felted animals; Scroll down for video tutorial.
It is also very calming and saves you sitting by the post box like this, impatiently waiting for your curly wool to arrive.
VIDEO TUTORIAL
Here is a quick video (part 2) showing you how easy it is. I have used a coarse rug yarn but any yarn with an element of wool in it will do.
Use any yarn you have in your craft box; It is easier to apply if it has some wool content. I have used a coarse rug yarn and a really soft Merino for these two gorgeous sheep.
Create beautiful texture with standard yarn
You will also find out how to add this lush, art yarn (video part 1) to your projects. I used a 40 triangle needle as it is a little easier but a standard (usually a 36 or 38 gauge) will do just fine.
Needle felted eyes look great but I also love the sparkle and shine you get from a glass bead. I always find it funny that, when some of my students have spent hours creating their needle felted animal, they say they find sewing on the eyes the hardest part. I think it is because they seem a little bit fiddly but here is a quick way of doing it, in five minutes and four easy steps.
1 Use black thread and needle and sew through the side of the face – where your eyes will sit – and repeat a few times until your thread is secure.
2 Pop your bead onto the tip of your needle and pull it through.
3 Push your needle back through to the other side and pop on your second bead.
4 Repeat the process a few times until you can pull quite firmly on your thread, and both beads are secure. Finish by sewing through the back of the head a and cut the thread.
One of the trickiest things to do when creating face details is getting the really fine lines for the mouth and nose. It’s something I always spend time on with my workshop students so they don’t feel disappointed with the finishing touches. Practice, practice practice is the answer, a firm base on which to work, and less is more when it comes to the wool. When I say less is more, think even less than that. You only need the tiniest strand of wool to create really impactful details, add in a few simple techniques and you will soon be adding those details with confidence.
Top Tip: If it doesn’t look right don’t try and rectify it. Pull the wool off and start again. I often do this and it takes much less time than trying to fix the problem. Also, preparation is key so make sure the head is firm before starting. If the head is soft and squidgy you aren’t going to get the nice straight lines you want to achieve and your sheep or animal will look like they’ve been on the sauce.
Whatever your design, this technique can be applied to your project in many different ways.
Let’s get started and, if you haven’t made your head yet just click the link for the video tutorial: HOW TO CREATE A BASIC HEAD SHAPE
1 Create an impression of the mouth – Do this by ‘drawing’ the mouth onto the face with your felting needle. ‘Draw’ a V for the nose, a line down the centre and two shallow curves each side. Go over the lines you have drawn until they are clearly visible and defined. This is where your wool is going to sit and makes it so much easier to maintain a nice, even shape.
2 Roll a very, very thin wisp of wool between your fingers to gently mat it together (not vital but it helps). If you don’t think it is thick enough you can go over it again later. However, start with too much and it ends up looking like you have drawn it on with a felt tip. Place it on the top left of the V shape you have created and gently tack it down towards the bottom of the V shape. Top Tip: Make sure the wool is at least twice the length you need as it will be pulled into the face as you felt; you can trim it later.
3 Continue back up the V shape and leave the ends loose.
4 Use another thin strand of wool (longer than you will need) to create the line down the centre. Top Tip: Keep the wool taught with your free hand. This will help create a straight, even line and avoid a drunken grin.
5 Leave all the strands loose until you have completed the mouth.
6 As before, use a very thin strand of wool and felt along the mouth. Repeat for the other side.
Top Tip: Don’t be precious over the shape of the curve as this can be teased into shape before you finish.
7 Make sure the wool is secure before trimming and shape the mouth by gently rubbing the tip of you finger on the wool – in the centre – to pull it down slightly.
8 Your head is now ready for the eyes and that’s another easy tutorial. You can watch it Here or keep scrolling for the written tutorial.
Top Tip: Sometimes the mouth can look a little off centre or lopsided. This is easily fixed by squeezing, and moving the head in your fingers – wool is still quite pliable, even when felted – until the features straighten out.
Create fabulous features for all your needle felted creations.
Needle felted eyes look great but I also love the sparkle and shine you get from a glass bead. I always find it funny that, when some of my students have spent hours creating their needle felted animal, they say they find sewing on the eyes the hardest part. I think it is because they seem a little bit fiddly but here is a quick way of doing it, in five minutes and four easy steps.
1 Use black thread and needle and sew through the side of the face – where your eyes will sit – and repeat a few times until your thread is secure.
2 Pop your bead onto the tip of your needle and pull it through.
3 Push your needle back through to the other side and pop on your second bead.
4 Repeat the process a few times until you can pull quite firmly on your thread, and both beads are secure. Finish by sewing through the back of the head a and cut the thread.
A question I am often asked by new or beginner felters is how to complete the more fiddly finishing touches of a needle felting project. The small size and need for symmetry is something many struggle with when felting sheep ears, but it really doesn’t need to be a complicated process. The below video tutorial will show you all the techniques, tips, and tricks you need to create perfect sheep ears in just 15 minutes; or just 10 if you cut out the waffle.
Tiny ears are simple once armed with the right technique.
This video tutorial builds upon the written tutorial to show the entire process of creating and attaching sheep ears to your creation. If, like me, you are a visual learner and prefer to follow along with someone else, this real-time video tutorial is the one for you!
I will let you into a little secret; unless you are working on big projects you really don’t need a full wire frame.
Working with a wire armature can be a little daunting, especially if you are new to needle felting and, to be honest, I find working with a full wire armature a little fiddly. I usually prefer working with a firmer shape so I tend to work more with just part armature; usually just the legs, neck or tail. It’s easy and really useful for when something needs stability or to add detail or dimension that can’t otherwise be achieved e.g the neck and legs on the flamingo, the tail and legs of the mouse and the life size ears of the Snow hare below.
Wire is used just for the neck and legs of the flamingo Wire wrapped neck is then felted straight onto the body
TAKE YOUR PROJECT UP A CREATIVE NOTCH
See how using paper covered floristry wire can take a project to the next level. I have used wire only for the legs and tail on this fabulous cat; a happy accident who started life as a mouse. Because the wire is paper covered the wool sticks to it really well. No need for messy wax. For a super smooth finish just roll firmly between the palms of your hands. You can also dip the pieces in hot water before rolling firmly for an even firmer finish.
Use paper covered wire for a super slim and polished finish!
Wrapping wire is really easy and can be done quite quickly and simply, but don’t be too ambitious and decide that tiny fingers and toes are going to be your first attempt. You will almost certainly set yourself up for a fail at the first hurdle and probably run for the needle felting with wire hills. I still avoid tiny fingers and toes – if there is another option – so don’t sweat it.
Feet and tail are wire wrapped for shape and stability. The tail helps keep the mouse upright.
Instead, get used to wrapping wire and creating simple shapes. Most important is the wool and wire you use. Get those right and the task is so much easier, a lot more fun and negates the need for any messy wax or glue.
The ears of this life size Snowshoe hare were 10 inches long and the wool was wrapped around an oval wire frame, then needle felted to the head.
What wire should you use?
My favourites are floristry wire (the paper wrapped kind) or cotton covered pipe cleaners. Using either of these means the wool holds really well as you wrap it around the wire and requires little felting, thus reducing the risk of broken or bent needles and no need for messy wax.
Top Tip: I like to use the old-style cotton covered pipe cleaners. Look for the tobacconist kind as the wool sticks to these better than the chenille ones. They are also a lot cheaper than the craft ones.
Wire size/gauge – I usually opt for 0.5mm or 1mm if I’m working on something larger.
Wool
It’s all personal preference but for me it is usually wool top/roving because you can use long, continuous lengths that can be pulled really tightly around the wire, giving it a lovely smooth, neat finish. I like to use white Jacob or Shetland tops but any wool top will do.
Wax
I don’t use it unless I am wrapping tiny fingers and toes. I seem to get more on myself than the project so I avoid it if possible and find that I rarely need it anyway. That said, I know some felters who get on really well with it so it really is personal preference.
TRY THE MINI TUTORIAL BELOW!
Have a practice by following the tutorial below. This one is for creating Flamingo legs but the same method can be used for any felting project. If you are creating sheep or hares just continue to wrap your wool around the wire to build up the limbs.
Top Tip: This is where the majority of needles get bent or broken so take care and use the ‘softly softly’ approach.
1 Create the shape you want with your wire. I am using 0.5mm tape covered floristry wire, 24cm long which I have doubled over for strength and stability. There is no need for pliers with this gauge wire as it bends and twists easily.
Create your shape
1 Pull a thin piece of wool top/roving down the long length of your wool; it needs to be thin so it covers the wire without bulking it out.
2 Start to wrap tightly down from the top of the leg (this is to cover the wire). Tip: wrap a few times in one place at the top of the leg and rub around with your fingers to mesh the fibres together so they hold (no need for wax).
3 and 4 Wrap around the first half of the foot then pull the length of wool through the hoop.
5 Pull the loose length over the front of the foot and pull towards the back of the foot and felt gently a few times to hold it in place. Tip: I do it this way because I find it easier to cover the foot without showing any wire.
6 Continue to wrap around the foot until it is covered and felt each side.
Tip: Finish felting through the top of the foot and pull, or trim, any excess from underneath.
Your legs are now ready to attach to your creation.
Building up the legs
If you need chunkier legs, say something like mice – just continue to wrap with your wool until you are happy with the size and shape. Top Tip: always leave loose wool at the top of the wire so you can felt it to the body.
Mice Legs: White Jacob wool top wrapped around a pipe cleaner. The loose wool is then used to felt them firmly to the base of the body.
Standard cotton pipe cleaners were used for the sheep and pigs legs in these photographs.
I love creating new needle felting video tutorials for you all, and anything that gives you the confidence to try this amazing craft is a win win for me. You can felt along with or without a a Lincolnshire Fenn Crafts Needle Felting Kit and all you need is a cuppa, felting needle, mat and your wool stash. My videos are perfect for even the most nervous of beginners and this one shows how to create really simple, but super cute, details for your animal faces, in just ten minutes! I’m not kidding, it really is only ten minutes.
KEEP IT SIMPLE
This has always been my mantra and the video tutorials on this blog and YouTube are designed to do just that. They are the building blocks of needle felting; a perfect beginners introduction on how to get it right from the very start.
If you don’t have any needle felting supplies at all then my online shop has everything you need. From wool, to felting needles, and complete starter kits; for nervous beginners to confident needle felters. I have designed and put together every single kit myself, and there is a huge range to choose from.
VIDEO TUTORIAL – HOW TO NEEDLE FELT SHEEP FACES
These techniques can be used on almost any animal, from sheep, dogs, seals, rabbits… the list is endless. It’s not hard but just takes practice and, if it goes wrong, don’t worry. Just pull it off and start again; that’s what learning a new craft or technique is all about.
Ready to dive into needle felting those adorable animal eyes? Hang on tight, because below I’ve whipped up a super-duper easy tutorial just for you. This gem is all about taking your needle felting projects to the next level with the very same 8 step method I love to use on my own projects. Now, if those nerves are getting the best of you, no sweat! Give it a whirl with a couple of trial runs. And guess what? My guidance is always in easy-peasy steps, so take your time and start again if you’re not happy with the first one or two.
Are You A Complete Needle Felting Newbie?
There’s a whole lineup of newbie-friendly video tutorials waiting for you. I’m talking about my “needle felting for beginners” series, where I break it down – heads, legs, bodies, and ears. It’s like getting a free front-row seat to my workshops, minus the biscuit breaks. These videos stand tall on their own, but let’s not forget they’re a match made in heaven with the needle felting kits from Lincolnshire Fenn Crafts. So, here’s to some joyful felting! Get those hands busy and let the fluffy magic unfold!
Let’s talk eyelashes – the cherry on top, the breeze on a summer day. Trust me, it’s the easiest bit to jazz up your critter. And below I’ve whipped up a quickie four-step guide.
Eyelashes are the quickest – we are talking a couple of minutes – and easiest feature you can add to your projects. They also create a striking finishing touch to your animals features.
As I sat down to make a sheep at the weekend I decided to take some of my own advice and step out of my comfort zone. I have been wanting to make a pig for months but time, as always, ran away with me and other aspects of the business demanded my attention. So, I changed tack and pulled up various images of pigs on Google; even if your creations are not true to life a photo is always great for reference, proportions etc.
Now, you would think pigs, with their simple shapes and obvious snout wouldn’t be too hard… Not so. Their perceived simplicity means that there is nowhere to hide when it comes to making mistakes and that body and head shape took way longer than I expected. However, now I know what I would change for the next one. Overall I am pretty pleased with the end result but I would definitely do a few things differently next time; bigger snout; change how I assembled it; more work on the face.
As far as technique is concerned I tend not to use full body armatures*, preferring to work with a much more solid shape and my favourite British wool tops. Instead, I used 1mm paper covered wire for the legs only to aid stability and create a leaner leg. I prefer paper covered wire as the wool holds much better when wrapping and negates the need for any messy waxes or glue. I wrapped each leg in a base layer of white Jacob top then added another layer of carded Corriedale flesh leaving the trotters exposed for contrast.
*Some pieces require a full armature, especially if you want to pose your piece when it’s finished. Carded wool usually works best for this and creates a much softer sculpture requiring much less use of the felting needle.
The body core is grey Jacob top which is a lovely coarse wool top that felts really easily and is still one of my favourites after six years of working with it. Felting the core really firmly allowed me to shape the wool once it was finished creating a nice curve along the back. See video tutorial: HOW TO CREATE A FIRM BODY
I actually made the body, head and snout as one piece but would definitely make the snout separately next time because it lost a lot of its definition and I had to build it up again. I then covered the whole piece in a lovely carded Corriedale flesh, felting just until it held using my 38 needle at a diagonal angle to reduce needle marks.
You may be wondering why the core colour is a complete contrast to the top layer; this enabled me to create that lovely dark wiry detail that you will see on many pig breeds which sits in dark contrast to the really light top coat. This contrast is achieved by using a 32 reverse needle to pull through the dark grey Jacob wool top, enabling it to sit on top of the flesh colour. Wool tops work really well for this as they have a much longer fibre length than carded wool which allows them to be pulled through the body without breaking off.
Ears were the easy part and using a photograph for reference makes it much easier to get the correct shape and proportions. My needle felted ears tutorial shows you my favourite, super easy technique for creating animal ears: TAKE ME TO THE TUTORIAL
Finally, I covered a short piece of 0.5mm paper wrapped wire in carded flesh to create the curly tail; roll vigorously in the palm of your hands once the wool is attached. This will create a lovely firm finish which stops the wool from ‘sagging’ when it is curled.
Add a couple of glass beads for eyes and hello Twiggy The Piggy*
*I claim no responsibility for the name. Blame lies solely with my good friend, Nancy (author of the amazing Maine Coon cat tutorial) who named her ‘Twiggy The Piggy’. I told her it was only marginally better than Babe but she insisted…
Needle felting kits for all abilities are available on the website and Etsy: