Stylish Nordic Felt Decorations You Can Make Yourself

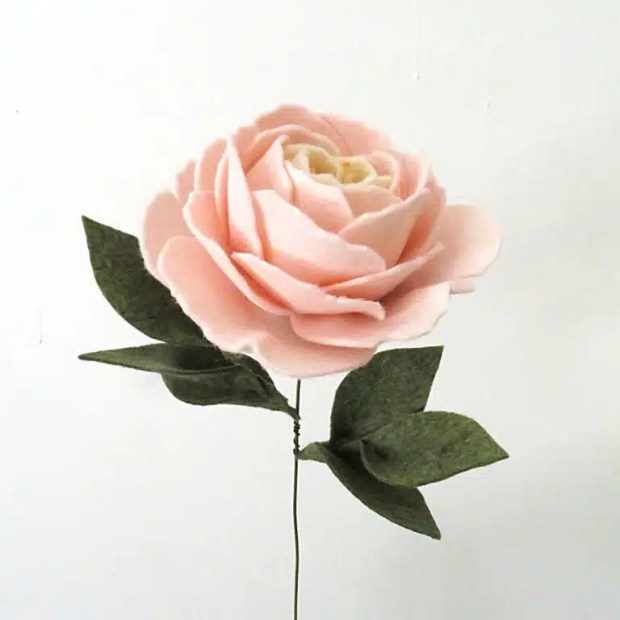
What a thrill to feature, and showcase the free tutorials, and amazing handmade collection from felt florist, The Tsubaki. They are the perfect addition to a minimalist, or simple Nordic style Christmas décor.

Indeed, my own home is full of her beautifully created cut felt flowers and stems; her Eucalyptus stems, Peonies, and Cherry Blossoms are to die for!

SCROLL DOWN FOR FREE FESTIVE TUTORIALS

Yuki works with flat felt creating intricate designs for flowers, holiday décor, wall hangings and so much more, and her amazing Floriography (the language of flowers) skills are inspired by her creative Japanese heritage and the ever changing seasons.

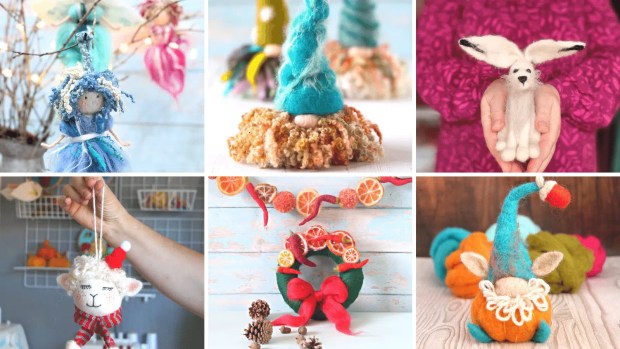
FREE TUTORIALS FROM THE TSUBAKI From perfect Poinsettia’s to marvellous mini trees, why not create Yuki’s beautiful creations yourself. Click on the photos below and follow the links for some festive free tutorials. You will soon find yourself begin to relax, unwind, and enjoy the process of some meditative creativity.

MEET THE MAKER

Bringing together her love of nature and creating using felt, Yuki Brittain started The Tsubaki in 2017. Now, just a few years later, her business is flourishing and she is fondly known as ‘the felt florist’.

Introducing Yuki Brittain from The Tsubaki

I was brought up in a very creative family in Japan surrounded by craft and people designing and making things! My grandmother made Kimonos, my grandfather taught me how to make straw shoes, my father still loves DIY and making his own fishing tools from scratch and my mother was also involved in the craft world. Naturally I absorbed a lot.

TURNING A DREAM INTO REALITY

I started designing felt floral gardens after becoming a mum of 2 and deciding now was the time to follow my dreams of designing artificial flowers from felts. Creating natural looking flowers has given me a renewed energy and a connection to an artistic world I have always dreamed of. Our felt flower shop offers wedding bouquets, home flower arrangements, botanical gifts and more, all handcrafted in the UK.

ETHOS

Simplicity and calm. I attempt to create a sense of peacefulness all the way from my products to the design of my website to the service I provide. My aim is to transmit the beauty of nature into people’s homes and to give people a moment of clarity.

THE PROCESS

My inspirations come from the outside world. I enjoy walking in the woods near my home, seeing the changes in nature throughout the seasons. My ideas on what to design usually come from these moments when connecting with nature. They can come at any point when I am outside so I always carry a sketchbook to write or draw designs as soon as inspiration hits!

I am also a keen student of flowers and visit many gardens throughout the UK and keep updated with the latest trends through social media, the internet and magazines. I like to make my flowers as representative as possible to real life so I practice the designs many hundreds of times before settling on a style.

INSPIRATION

Currently I live in the countryside in Surrey. I have amazing woods within a five minute walk which I never take for granted as it gives me such a sense of belonging, amongst nature, flowers and the outdoors.

SHOP THE TSUBAKI COLLECTION

Yuki is constantly updating her designs to follow the seasons, and her beautiful website is so worth a visit, even if it is just to look at the stunning Peonies and dazzling felt flower bouquets.

BOOK AN ONLINE COURSE

If you have tried the free tutorials and fancy something a bit more in depth then Yuki has some amazing online courses. At just £20 per course this is amazing value, and the results are stunning! There is even a master class so you can do a deep dive into creating beautiful felt flowers with ‘The Felt Florist’.

BOOK AN ONLINE COURSE

Yuki has created courses designed for all levels, from a beginner to experienced flower makers. Showing you step by step how to recreate some of her beautiful designs.

Get social with The Tsubaki. Happy festive felting!

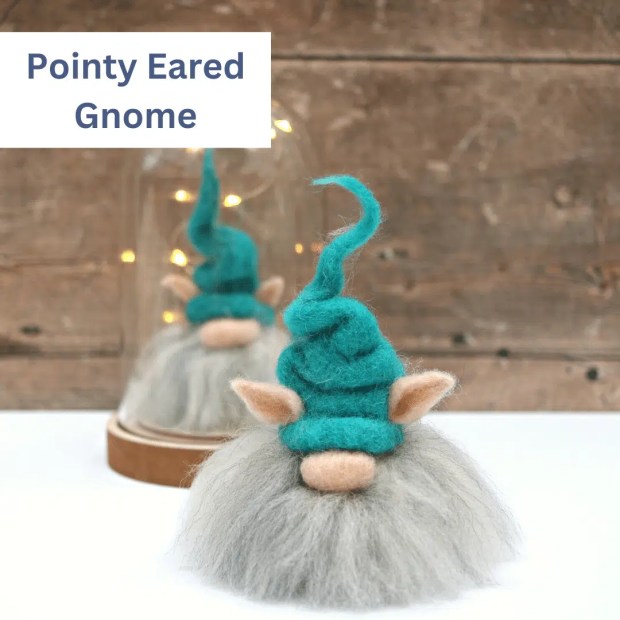
MAKE SPECTACULAR NEEDLE FELTED DECORATIONS

Why not try needle felting with these fabulous free tutorials, and fill your home with beautiful handmade Christmas décor. Made with love, by you!

Image shows cute needle felted Christmas decorations. DIY Christmas wreath, bauble, gnomes and fairies

How To Make Spectacular Needle Felted Christmas Decorations

FILL YOUR HOME WITH SEASONAL ‘HANDMADE BY YOU’ JOY

Tis the season to get creative and, whatever your seasonal style I have a Christmas craft project to suit. From cute and quirky, to stylish and minimal. It’s all here, on the blog, completely free, and all you have to do is fill your seasonal stockings full of inspiration, grab your wool and needles, and get felting. And of course, ten times better than shop bought and made with love by you.

There are so many great seasonal ideas on this page you won’t know where to start. From Nordic gnomes giving you all the hygge feels, cute snowmen, baa-ble tree decorations, super stylish wreaths and garlands, to forest fairy tree toppers. There’s a felting project to suit every taste, even Christmas pumpkins. Proof, if ever needed, that pumpkins are not just for Halloween. And it has to be said, these cool winter wonderland pumpkins wouldn’t look out of place on the set of a Disney movie.

Needle felting is a fun, creative process that can be used to make some absolutely adorable Christmas crafts, and I have some fabulously fully festive needle felting projects to share with you! You’ll need wool tops/roving or carded wool, felting needles, and a felting mat.

From stylish wreaths and garlands to quirky gnomes, there’s a project for every age and ability!

Check out the fabulous felting projects below, and make your holiday season merry and bright!

VIDEO TUTORIALS

The Felt Hub on YouTube is full of seasonal creativity. Just click on any of the photos below and you can felt alongside me, workshop style

SHOP NEEDLE FELTING PATTERNS

My needle felting kits and patterns have been inspiring creativity since 2014 and, if you are finally ready to take the needle felting plunge then you will find everything you need on the WEBSITE or over at ETSY

SKILL LEVEL

When it comes to these tutorials and kits, they are for all abilities. Allowing you to make your project as difficult, or intricate as you like. Keep it simple if you are just starting and build your skills. But once you have one project under your crafty belt there will be no stopping you. However, be warned, it is a highly addictive craft so be prepared to loose hours, maybe even days to this amazing hobby.

WANT SOMETHING LESS SEASONAL?

Just pop over to the home page HERE and take your pick from the drop down menus. You will find this blog is packed to the rafters with free needle felting tutorials, from learning basic shapes to more advanced projects. There are even free patterns and downloads for you to try.

Shows images of needle felted characters. Text says: Join the VIP Felt Club and get creative inspiration straight to your inbox.

BE A VIP! It’s completely free and you will receive a free, super easy,  needle felting pattern, lifetime discount code, exclusive early access to new product launches and promotions, as well as notification of new tutorials and live needle felting workshops.

So, what are you waiting for? It’s time to get cosy with crafts so just grab your wool, felting needles, a big dose of enthusiasm, and maybe a glass of something nice. Cheers and happy festive felting!

How To Make DIY Needle Felted Pumpkins – Easy Autumn Crafts

Yes, it’s back – the pumpkin edit is here! Autumn and Fall is the time when we really start to get stuck into or craft activities again, and there’s no better place to start than my super easy tutorials, ‘How To Make DIY Needle Felted Pumpkins – Easy Autumn Crafts’.

Image shows a basket of handmade needle felted pumpkins
From wool to needle felted pumpkin in just 30 minutes

Needle felted pumpkins are completely addictive and one of the easiest needle felting projects there is. Each year you will find something new has been added to my pile of pumpkin craft projects and there is a pumpkin style to suit every taste and style.

This is my round up of all the most popular pumpkin tutorials and needle felting kits I have created over the last few years.

NEW! NEEDLE FELTED PUMPKIN TUTORIAL AND KIT – HOW TO MAKE DIY NEEDLE FELTED PUMPKINS – EASY AUTUMN CRAFTS

MAKE TIME: 20 minutes per pumpkin

Image shows photos of handmade DIY pumpkins
Autumn DIY décor that looks better than shop bought, and at a fraction of the price!

YOU WILL NEED:

  • Core wool – small handful
  • Carded orange wool – 5g
  • Wool tops – 5g
  • Felting needle – 38 star is a good all rounder
  • Felting mat

Watch the tutorial below, or order the needle felting kit form the WEBSITE or ETSY

This is a super easy needle felting kit with a full, step by step, hold your hand video tutorial so you can felt along with me workshop style. These gorgeous needle felted pumpkins are utterly addictive and make for some really show stopping Autumn/Fall décor! If you order the kit you have the option to add the gorgeous crochet leaves that I bagged from another fabulous handmade maker.

Wool looks great blended for different colours and effects.
Video tutorial is suitable for complete beginners to needle felting.
Ideal as décor, gifts, garlands or for seasonal markets.

VIDEO TUTORIAL

WINTER WONDERLAND PUMPKINS

MAKE TIME: 30 minutes per pumpkin

YOU WILL NEED:

  • Core wool – large handful
  • Carded wool – White, aqua and grey
  • Wool tops – 5g
  • Silk fibres
  • Felting needle – 38 star is a good all rounder
  • Felting mat

Watch the tutorial below, or order a Winter Wonderland needle felting kit form the WEBSITE or ETSY

Pumpkins are most definitely not just for Christmas and, with my Winter Wonderland pumpkins you can keep them up right through to the new year.

They are cool, wintry, glamourous, and look like they came straight out of a Disney movie. They are also one of my most popular Autumn craft kits, and why wouldn’t they be?

WATCH VIDEO TUTORIAL

FIRE AND ICE NEEDLE FELTED PUMPKIN – MORE GLAMOUROUS THAN AN EPISODE OF DYNASTY

Make a seasonal statement this year and create a bold and glamorous, full size ‘Fire And Ice’ pumpkin.

MAKE TIME: 1 hour

Image shows a glamourous needle felted pumpkin with shiny red beads
Your autumn and fall handmade décor just got super stylish.

YOU WILL NEED:

  • Core wool – enough for full size pumpkin, approximately 30g
  • Carded red wool – 15g
  • Wool tops – 5g
  • Silk fibres and silk throwsters waste
  • Felting needle – 38 star is a good all rounder
  • Felting mat

Watch the tutorial below, or order the needle felting kit form the WEBSITE or ETSY

Totally unique, your autumn and fall handmade décor just got super stylish. Watch the needle felting tutorial below and can create your own ‘Fire And Ice’ full size pumpkin in just 30 easy minutes.

This one wouldn’t look out of place in a Homes And Gardens feature and, as always, I have carefully selected the wool and fibres and, for a touch of seasonal glamour, it is topped with fiery strung beads.

WATCH VIDEO TUTORIAL

EASY DIY AUTUMN WREATH

In just two hours you will have your own beautiful DIY wreath. You can adapt and change the colours, or go for pastels which look gorgeous. Whatever colours you decide on, you will have a beautiful seasonal arrangement that is unique and looks like you have just bought it from a boutique craft shop. You could even create a beautiful autumn/fall garland with pumpkins and acorns, to finish the look.

MAKE TIME: 2 hours

YOU WILL NEED:

  • Core wool – 30g
  • Carded wool in seasonal colours – 5g of each
  • Wool tops – 5g of each
  • Vine wreath
  • Acorn caps
  • Felting needle – 38 star is a good all rounder
  • Felting mat
  • Wooden BBQ skewer
  • Hessian ribbon

Watch the tutorial below, or order the needle felting kit form the WEBSITE or ETSY

Create stylish autumn/fall décor with this beautiful DIY needle felting kit, which is incredibly easy to make and an ideal needle felting project for any ability. Full written instructions plus a video tutorial will make this project a breeze, even for the most nervous of beginners.

It’s perfect for you if you’re looking for an exciting new creative outlet to bring some color into your life! With easy instructions, step-by-step video tutorial, and plenty of supplies, anyone can create their own beautiful Autumn wreath in just a couple of hours. Why not add an acorn garland for that extra touch of handmade seasonal creativity and, with my easy needle felting techniques, each acorn only takes a few minutes to make.

WATCH VIDEO TUTORIAL

TOTALLY TRADITIONAL DIY PUMPKINS

MAKE TIME: 30 minutes

Image shows traditional DIY needle felted pumpkins

YOU WILL NEED:

  • Core wool – 10g for medium pumpkin
  • Carded orange wool – 10g
  • Wool tops – 5g
  • Felting needle – 38 star is a good all rounder
  • Felting mat

If totally traditional pumpkins are your thing then these are ideal. It is one of my first pumpkin tutorials and is as popular as ever. As with all of my DIY pumpkins, it is a super easy, super fast, and fun project.

Watch the tutorial below, or order a Winter Wonderland needle felting kit form the WEBSITE or ETSY

Once you have made one you won’t be able to resist making another, then another… Soon you will be buried under a big pile of pumpkins and wondering if you have enough friends, and family to give them to. Watch the tutorial below, or order the needle felting kit form the WEBSITE or ETSY

WATCH VIDEO TUTORIAL

5 Easy Needle Felting Projects For Spring And Easter

As the weather gets warmer and the days get longer, it’s the perfect time to get your creative juices flowing. And what better way to do that than by learning a new crafting skill? I have for you, 5 easy needle felting projects for spring and Easter, perfect for beginners or just some relaxing creative down time. So whether you’re looking to learn how to bunny or bumble bee brooch or a springtime wreath or garland, I’ve got you covered. So get ready to let your imagination run wild and have some fun with these easy needle felting video tutorials!

NEEDLE FELTING KITS

Spring and Easter needle felting kits are available HERE on the Lincolnshire Fenn Crafts website.

5 QUICK AND EASY NEEDLE FELTING PROJECTS

Short on time? Well, whether you’re a beginner or an experienced needle felter, there’s something here for everyone. Grab your wool and felting needles and felt along with me. These step by step video tutorials make it easy peasy and you can adapt each project for fabulous spring and Easter décor or lovely gifts for your favourite people. Ready to get started? Let’s go!

VIDEO TUTORIALS

NEEDLE FELTED BUMBLE BEE BROOCH – MAKE TIME ONE HOUR

NEEDLE FELTED BUNNY BROOCH – MAKE TIME ONE HOUR

EASY NEEDLE FELTED MUSHROOMS – MAKE TIME 30 MINUTES

YUMMY NEEDLE FELTED MACARONS – MAKE TIME 15 MINUTES

EASY NEEDLE FELTED BALL IN 3 MINUTES

How To Needle Felt A Quirky Christmas Gnome?

Well what a blast this live workshop was, recorded in all it’s festive glory for you to enjoy. From his pointy ears to his massive snozzle, every part of this project is an absolute seasonal delight.

Believe it or not this gorgeous pointy eared gnome is a perfect project for everyone, even complete beginners. Learn how to needle felt a quirky gnome, using all my needle felting tips and quick wins. You will be able to create a project that looks like it was made by an expert needle felter, and in less than 90 minutes! How amazing is that?

Scroll down for video tutorial, or take your time and enjoy my creative suggestions.

I have added some sparkly fairy lights to my dome.

WHY NOT ADAPT THIS NEEDLE FELTING PROJECT TO SUIT YOUR FESTIVE THEME?

It is small enough to pop in a dome, hang from your tree, or create a festive gnome garland. I have just received a photo on my Facebook page where they have even been made as little place settings for the dinner table; how Christmas cool is that? However you display yours, you will have so much fun creating them so, time to grab your wool and needles and get making.

With his festive hat askew, funny ears and big nose, it is obvious he is just waiting for mischief around every corner , even the Grinch couldn’t resist him!

JUST STARTED NEEDLE FELTING?

Order your wool bundle or needle felting kit HERE

MAKE TIME: 70 minutes

  • Coarse wool top for the body
  • Colour carded wool for the hat
  • Grey and white wool top for the beard
  • Light carded wool for ears and nose
  • BBQ skewer to make the nose around
  • 1 x size 38 felting needle
  • Felting base

VIDEO TUTORIAL

I have split it into sections so you can skip the intro and cut straight to the felting, but please take time to appreciate my fabulously festive background 😉 🎄

Happy Festive Felting!

WHAT’S YOUR FAVOURITE PART?

I can’t decide whether it is the jauntily angled crooked hat, his pointy ears, or his giant nose. Let me know in the comments and share your photos with me.

P.S. Want more creativity? Subscribe below for creative updates!

HOW TO NEEDLE FELT A FESTIVE WREATH AND GARLAND?

CREATE THE CHRISTMAS WOW FACTOR!

This Christmas why not try making your own festive wreath and garland?

It never ceases to amaze me what you can create with felting wool and a felting needle??? My latest tutorial is this stunning needle felted Christmas wreath and garland; my take on the traditional dried fruit and chilli garlands we see each year. It’s like magic – a pinch of this, a wisp of that, and a tiny sup song of whatever takes your fancy, throw in a cookie cutter, and a wooden BBQ skewer and et voila!

MAKE YOUR OWN SUSTAINABLE CHRISTMAS DECORATIONS!

I love this idea for a festive door decoration. The bright colours of the needle felted fruit and chillies are so cheerful, and would definitely bring a smile to your guests as they come through your front door.
This is such an easy project to do and, although it does take time and patience, the results are beyond worth it! It’s actually really satisfying seeing the needle felted fruits take shape before your eyes as you needle felt them layer by layer. You can use different types of wool depending on what effect you’d like to achieve. What’s more, they can be displayed proudly, year after year, are natural, sustainable, and completely biodegradable.

This is a step-by-step tutorial and, if you’re new to needle felting, don’t worry because I’m going to walk you through it all as we go. After this post you’ll be ready for any holiday crafting projects!

DO YOU NEED THE WOOL BUNDLE OR KIT?

If you don’t have the wool or needles you can find them here, on the Lincolnshire Fenn Craft website. I have carefully curated my favourite wools to give you the best possible result.

HAVE ALL THE FELTING GEAR? THEN HERE’S YOUR MATERIALS LIST.

YOU WILL NEED:

  • Seasonal wool tops and carded wool for your oranges, lemons and chillies.
  • Forest green and Christmas red wool top/roving.
  • BBQ skewer for shaping your chillies. 
  • Polystyrene hoop for wreath
  • Length of wool yarn for threading your garland
  • Round cookie cutter or similar; ideal for perfectly round slices. However, I will also show you how to make them free hand.

Pin this image to your Pinterest board and save for later.

STYLE IDEA

Imagine this combination as the centre piece to your fireplace, and how realistic does that fruit look?

VIDEO TUTORIAL

I have split the video tutorial into three easy to follow parts. Hope you love it as much as I did. Subscribe to my YOUTUBE channel for instant notification of new tutorials!

Happy festive felting!

Make Your Own Needle Felted Nordic Gnome – Easy Tutorial

Using a BBQ skewer, or chop stick, as a needle felting tool makes many needle felting projects a whole lot easier, and faster to complete. It is also a great aid for creating symmetry, especially when it comes to legs and feet. It is the tool that no self respecting needle felter should be without, whether it’s your first needle felting project or your twentieth. Even better, you will probably find one, or both, at the bottom of your kitchen drawer, along with the sandwich toaster and vegetable juicer…

IT’S SUCH AN EASY PROJECT!

This gnome on a stick is easy to make and the solid hat means you can really go to town on the embellishments without spoiling the shape. Simple embroidery adds another creative and effective element. Time to make: 60-90 minutes. Beginners and perfectionists add on another 30 minutes.

WATCH THE VIDEO TUTORIAL OR SHOP THE CHRISTMAS NEEDLE FELTING KITS

You will need:

  • Carded wool or wool top (AKA roving) for the hat, body and nose; I am using carded wool for both.
  • Felting needle – size 38 (or medium) is a good all rounder.
  • Wooden BBQ skewer or chop stick; metal is too slippery for the wool to hold onto.
  • Felting mat: Foam, hessian or wool
  • For the beard use wool tops, curly wool or knitting yarn
  • Embellishments or embroidery thread for decoration

TOP TIPS BEFORE YOU START!

  • Needles are sharp so keep your fingers out of the way. If in doubt, use finger protectors. Not suitable for young children and older children should be supervised at all times.
  • When working around your stick avoid hitting the wood with your needle as it could break. Working at a diagonal angle will help avoid this.
  • Keep the wool firm as you wrap, using thin lengths of wool, and take your time to build it into a cone shape. If your wool is too bulky you will struggle to get a nice smooth shape.
  • If you start to loose the shape, simply unwind a little wool and do it again.
  • Enjoy yourself and, if it’s your first project, go easy on yourself; you are only on chapter 1 so don’t compare yourself to others who are on chapter 5.

There is no end to the style of gnomes you can create and how gorgeous are these visions in pink and raspberry! I love the impact created by these simple embroidered snowflakes against the bold raspberry colour.

EMBROIDERED SNOWFLAKES

Embroidered snowflakes are super simple! Just thread a large needle with yarn and criss cross four straight lines until you have a seven pointed star. They can also be needle felted on.

TOP TIP: Keep the yarn loose so as not to sistort the shape of the snowflake.

Image shows pretty pink DIY Christmas gnome decorations.

HAT AND BODY

1 Wrap your wool around the stick and felt into place

2-4 Continue to wrap and felt until you have covered half of your stick, longer if you want a bigger hat.

5-6 Continue to wrap and felt to secure

Image shows how to start making your own DIY Christmas gnome decoration.

7 Continue to build the shape but don’t take the wool to the tip bas you want to create a cone shape.

8-9 Create your shape along the stick by using your needle at a diagonal angle.

10 Widen the base as you felt; mine is approx. 6cm diameter

11-12 Create the body the same way but aim for a barrel shape approx. 6cm in height, slightly narrower at the top and wider at the base for stability.

Image shows how to make a needle felted gnome hat.

13-14 Remove from the stick and continue to shape and firm

15 Create a cavity at the base of the hat for the body to sit in.

16 Narrow the top, if necessary, by felting at a diagonal angle from the top towards the base.

17-18 Pop some fresh wool on the top of the body and felt into the hat.

Needle felted gnome tutorial.

19-20 Now felt through the hat and into the top of the body, until it is held firmly.

Needle felted gnome tutorial.

NOSE

21 Wrap the end of a small piece of wool firmly around your wooden skewer, aiming for a short oval shape.

22 Continue to wrap the wool around the stick (no need to use your needle yet) and use your thumb and finger to stop it from moving down the stick and becoming too long. Felt a little to secure but leave the ends slightly loose. TOP TIP: Don’t forget to keep it tight as this will create a great shape. Make it any size you want.

23 Check you are happy with the size and shape.

24 Remove from the stick and felt each side (where you left the wool loose) just under the brim of the hat.

25 It needs to be a good size as it will soon disappear under the beard, so if it’s too small it will look lost.

Needle felted gnome tutorial.

BEARD

26-28 Felt the beard wool or locks just under the brim of the hat. This will keep it looking neat.

29 Add in more colour if you want to.

30-31 You can create a beard at the front or, as I have done, create a full skirt all the way around the hat.

Needle felted gnome tutorial - adding a curly beard.

Et voila! Leave it simple or add embellishments. I have wrapped wool yarn around this one and created a loose pom pom at the top. Now go forth and make more gnomes; it would be rude not to and they always look better in twos, threes, fours…😉

DO YOU WANT MORE SEASONAL CRAFT IDEAS?

Then look no further as there are so many other CHRISTMAS NEEDLE FELTING PROJECTS for you to try.

THERE’S A PROJECT TO SUIT EVERY STYLE, ABILITY, AND TASTE

From winter pumpkins to penguins, cute to traditional, Nordic gnomes to forest fairies. Fill your seasonal home with creativity and handmade love.