Make Your Own Needle Felted Nordic Gnome – Easy Tutorial

Using a BBQ skewer, or chop stick, as a needle felting tool makes many needle felting projects a whole lot easier, and faster to complete. It is also a great aid for creating symmetry, especially when it comes to legs and feet. It is the tool that no self respecting needle felter should be without, whether it’s your first needle felting project or your twentieth. Even better, you will probably find one, or both, at the bottom of your kitchen drawer, along with the sandwich toaster and vegetable juicer…

IT’S SUCH AN EASY PROJECT!

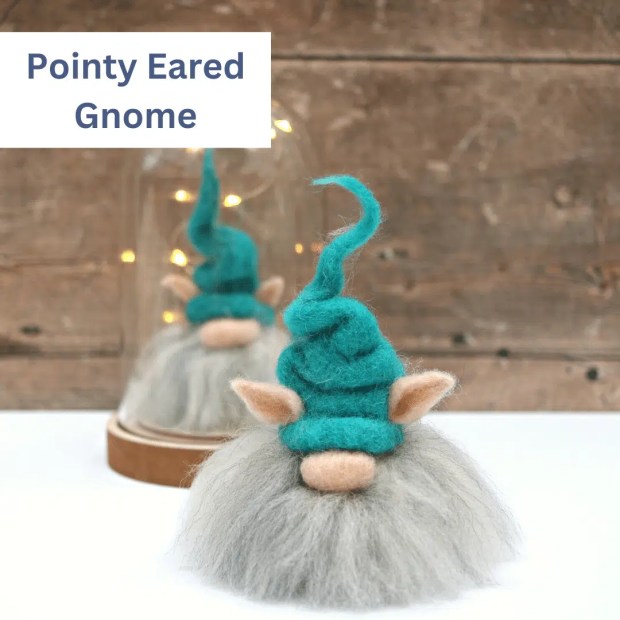
This gnome on a stick is easy to make and the solid hat means you can really go to town on the embellishments without spoiling the shape. Simple embroidery adds another creative and effective element. Time to make: 60-90 minutes. Beginners and perfectionists add on another 30 minutes.

WATCH THE VIDEO TUTORIAL OR SHOP THE CHRISTMAS NEEDLE FELTING KITS

You will need:

  • Carded wool or wool top (AKA roving) for the hat, body and nose; I am using carded wool for both.
  • Felting needle – size 38 (or medium) is a good all rounder.
  • Wooden BBQ skewer or chop stick; metal is too slippery for the wool to hold onto.
  • Felting mat: Foam, hessian or wool
  • For the beard use wool tops, curly wool or knitting yarn
  • Embellishments or embroidery thread for decoration

TOP TIPS BEFORE YOU START!

  • Needles are sharp so keep your fingers out of the way. If in doubt, use finger protectors. Not suitable for young children and older children should be supervised at all times.
  • When working around your stick avoid hitting the wood with your needle as it could break. Working at a diagonal angle will help avoid this.
  • Keep the wool firm as you wrap, using thin lengths of wool, and take your time to build it into a cone shape. If your wool is too bulky you will struggle to get a nice smooth shape.
  • If you start to loose the shape, simply unwind a little wool and do it again.
  • Enjoy yourself and, if it’s your first project, go easy on yourself; you are only on chapter 1 so don’t compare yourself to others who are on chapter 5.

There is no end to the style of gnomes you can create and how gorgeous are these visions in pink and raspberry! I love the impact created by these simple embroidered snowflakes against the bold raspberry colour.

EMBROIDERED SNOWFLAKES

Embroidered snowflakes are super simple! Just thread a large needle with yarn and criss cross four straight lines until you have a seven pointed star. They can also be needle felted on.

TOP TIP: Keep the yarn loose so as not to sistort the shape of the snowflake.

Image shows pretty pink DIY Christmas gnome decorations.

HAT AND BODY

1 Wrap your wool around the stick and felt into place

2-4 Continue to wrap and felt until you have covered half of your stick, longer if you want a bigger hat.

5-6 Continue to wrap and felt to secure

Image shows how to start making your own DIY Christmas gnome decoration.

7 Continue to build the shape but don’t take the wool to the tip bas you want to create a cone shape.

8-9 Create your shape along the stick by using your needle at a diagonal angle.

10 Widen the base as you felt; mine is approx. 6cm diameter

11-12 Create the body the same way but aim for a barrel shape approx. 6cm in height, slightly narrower at the top and wider at the base for stability.

Image shows how to make a needle felted gnome hat.

13-14 Remove from the stick and continue to shape and firm

15 Create a cavity at the base of the hat for the body to sit in.

16 Narrow the top, if necessary, by felting at a diagonal angle from the top towards the base.

17-18 Pop some fresh wool on the top of the body and felt into the hat.

Needle felted gnome tutorial.

19-20 Now felt through the hat and into the top of the body, until it is held firmly.

Needle felted gnome tutorial.

NOSE

21 Wrap the end of a small piece of wool firmly around your wooden skewer, aiming for a short oval shape.

22 Continue to wrap the wool around the stick (no need to use your needle yet) and use your thumb and finger to stop it from moving down the stick and becoming too long. Felt a little to secure but leave the ends slightly loose. TOP TIP: Don’t forget to keep it tight as this will create a great shape. Make it any size you want.

23 Check you are happy with the size and shape.

24 Remove from the stick and felt each side (where you left the wool loose) just under the brim of the hat.

25 It needs to be a good size as it will soon disappear under the beard, so if it’s too small it will look lost.

Needle felted gnome tutorial.

BEARD

26-28 Felt the beard wool or locks just under the brim of the hat. This will keep it looking neat.

29 Add in more colour if you want to.

30-31 You can create a beard at the front or, as I have done, create a full skirt all the way around the hat.

Needle felted gnome tutorial - adding a curly beard.

Et voila! Leave it simple or add embellishments. I have wrapped wool yarn around this one and created a loose pom pom at the top. Now go forth and make more gnomes; it would be rude not to and they always look better in twos, threes, fours…😉

DO YOU WANT MORE SEASONAL CRAFT IDEAS?

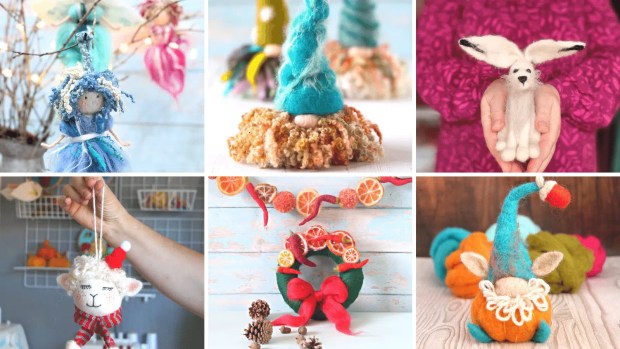
Then look no further as there are so many other CHRISTMAS NEEDLE FELTING PROJECTS for you to try.

THERE’S A PROJECT TO SUIT EVERY STYLE, ABILITY, AND TASTE

From winter pumpkins to penguins, cute to traditional, Nordic gnomes to forest fairies. Fill your seasonal home with creativity and handmade love.

Make Your Own Autumn Wreath! Get cosy with crafts

Get ready to spruce up your space with some autumn charm and make your own autumn wreath. Say hello to your new favorite DIY project: crafting your very own autumn wreath. With just a few simple materials and a bit of creativity, you can create a stunning needle felted wreath that will add a touch of cosy elegance to any room.

This DIY tutorial is perfect for beginners and experienced crafters alike. Whether you’re a seasoned pro or just dipping your toes into the world of crafting, you’ll find this project to be a breeze. And the best part? You’ll be amazed at how quickly you can whip up this beautiful needle felted pumpkin and acorn wreath!

Image shows a needle felted autumn wreath

With easy-to-follow instructions and step-by-step guidance, you’ll be creating adorable needle felted pumpkins and acorns in no time. Plus, I’ve got a handy video tutorial to walk you through the process, so you can follow along at your own pace.

So why wait? Dive in and get started on your autumn wreath today! Check out the materials list, below to gather everything you need for this fun and fabulous project.

MATERIALS LIST:

SHOP PATTERN

P Is For Pastel Pumpkins: Embracing a Delicate Palette

Explore the charm of pastel pumpkins as an enchanting departure from conventional color schemes. This serene woolen palette offers an ideal touch for spring or winter decor, infusing spaces with cool elegance.

Watch The Video Tutorial

Join me as we dive into the delightful world of needle felting together, step by step. With my laid-back and easy-to-follow video tutorials, you’ll gain the skills and confidence you need to adorn your home with charming handmade autumn decorations. Whether you’re a seasoned crafter or just starting out, my tutorials are designed to make the process enjoyable and accessible for everyone. So grab your materials, settle in, and let’s get crafting! Together, we’ll fill your home with the warmth and beauty of your own unique handmade creations.

Have a needle felting question?

Feel free to ask me anything! I absolutely adore questions, especially when it comes to needle felting. Whether you’re curious about technique tips, project ideas, or just want to chat about all things related to this wonderful craft, I’m here to help. No question is too big or too small, so don’t hesitate to reach out. Let’s dive into the world of needle felting together and explore all the creativity it has to offer!

You will love reading these posts as well!

Want to Start needle felting now?

Instantly download a needle felting pattern and get started straight away! On the hunt for inspiring needle felting patterns? There are patterns for all abilities on the website, from nervous beginners to confident needle felters, there is a pattern and video tutorial for you.

Easy Needle Felting Projects – The Pumpkin Edit. What’s your style?

Craft your own seasonal happy space with a needle felted pumpkin or two, or three, or fill the whole house (as I do) with these glorious DIY projects that will take us into autumn/fall and beyond.

Make pumpkins with personality using carded wool or wool tops

Scroll down for video tutorials

I am a firm believer that pumpkins are absolutely not just for Halloween and I have you covered with three pumpkin tutorials that will take you right through September to December and Christmas. Yes, of course there’s a Christmas pumpkin!

If you are nervous about starting needle felting then this is the project for you!

Not only are they fabulous needle felting project but, they are also one of the quickest and easiest needle felting projects to make, taking a mere 30 minutes! They will add instant impact to any room, and are impressive seasonal gifts for friends and loved ones and, If the weather permits, they look wonderful on an outside dining table or strung as a garland from a tree or deck.

Keep it simple or go for all out bling and glamour. Go traditional or opt for a style that the cast of Frozen would be envious of. Whatever your style, there really is a needle felted pumpkin for everyone and no needle felting experience necessary; just a few needle felting supplies and a big dollop of enthusiasm.

There are three video tutorials to choose from – traditional, fire and ice and winter wonderland – and you could have all three made in just 90 minutes!

I have popped a materials list above each one but these are just suggestions and anything goes. Don’t worry if you haven’t any carded wool as there is also a tutorial using wool tops. See I told you I have you covered!

Happy creating and I would love to see your pumpkin photos to add to the community gallery. You can email them to me at: info@lincolnshirefenncrafts.com or send them to me via my FaceBook page.

Do you need wool or supplies?

Links for kits, wool and needles are also below or SHOP WEBSITE

1 NEW! FIRE AND ICE PUMPKIN

Shop wool and kit

Materials

  • Core wool
  • 25g carded wool bat (fiery orange/red)
  • Bright white wool top
  • Natural white tussah silk
  • Silk waste (for cobweb/ice effects)
  • Wooden skewer to make stalk
  • Acrylic beads

2 TRADITIONAL PUMPKIN

SHOP WOOL AND KIT

Materials

  • 25g orange carded wool batt
  • Core wool
  • 5g approx. Mustard wool top for leaves and stems
  • 1 x Felting needles (size 36 or 38 is a good all rounder)
  • Felting mat

3 WINTER WONDERLAND PUMPKIN

SHOP WOOL

Materials

  • 25g White, grey or aqua carded batts
  • Core wool (for centre of project)
  • Beads and silk for embellishments
  • 2 x Felting needles in storage tube
  • Felting mat

4 USING WOOL TOPS/ROVING

SHOP WOOL AND KIT

Wool colours

  • Assorted wool tops – autumn/fall colours
  • Core wool
  • 1 x Felting needles (size 36 or 38 is a good all rounder)
  • Felting mat

Show Stopping, Stylish Needle Felted Pumpkins

It’s coming to that time of year again and oh yes, do I have a treat for you!!!

If you have been following the blog for a while then you will know how much I love, love making pumpkins and I get a real kick out of coming up with new designs, and this years will not disappoint!

I am talking about a show stopping pumpkin that wouldn’t look out of place in a John Lewis advert or a Homes & Gardens feature. What’s more, it only takes 30 minutes from start to finish which is another reason I love making them.

This bold fire and ice style uses beautiful silk fibres and wool tops for contrast and effect, finished off with a string of fiery beads for a touch of glamour.

The video tutorial and materials list are below and you can purchase the wool bundle on the WEBSITE which includes everything in the materials list.

CLICK HERE FOR WOOL BUNDLE

MATERIALS LIST

You will need:

  • Felting needle (size 36 or 38 are good all rounders)
  • Felting mat
  • Core wool
  • Carded wool bat (fiery orange)
  • Bright white wool top
  • Stripy wool top with a silk blend
  • Natural white tussah silk
  • Silk waste (for cobweb/ice effects)
  • Wooden skewer to make stalk
  • Acrylic beads

VIDEO TUTORIAL

How to make a needle felted cactus

Hi crafters and felters

Create this needle felted cactus in a terracotta pot or tea cup; the perfect place to store your felting needles or to use as a pin cushion.

A fabulous , prickly project which involves several needle felting techniques including a soft sculpture base, using a wooden skewer to create perfect shapes, and letting your creativity run wild with the vibrant  flowers the cacti produce. Adding the spikes is a soothing and therapeutic process in which they can be added randomly or, if you love a bit of symmetry, placed in straight lines down each cactus arm.

The light blue/green cactus is based on my favourite cactus, the PILOSOCEREUS

As always, I spend a lot of time during the design process, creating projects I know you will love whilst carefully choosing the wool and fibres to suit the finished piece.

You will Need:

  • Core wool
  • White and green carded wool or wool tops
  • Wool tops for flowers, various colours
  • White wool top for spikes
  • Pot or cup to stand it in
  • 1 x wooden BBQ skewer or similar

Cactus needle felting kit can be purchased HERE or download the pattern HERE

Make sure you follow my  FACEBOOK PAGE so you don’t miss the live workshop updates.

Don’t worry if you haven’t got Facebook as my video tutorials are also available on my YouTube channel

It also makes a great felting needle holder or pin cushion.

It also makes a great felting needle holder or pin cushion

How To start Needle Felting – Easy Needle Felted Cactus

I adore this season in my garden, eagerly anticipating the possibility of my 19-year-old Cordyline blooming for the third time. The wait for this magnificent plant to flower, starting as a humble shrub, has been considerable, but the aroma it emits is simply divine—reminiscent of Jasmine with subtle notes of caramel.

MAKE YOUR OWN NEEDLE FELTED PLANTS

With plants and gardening at the forefront of my thoughts, I’ve designed a selection of super cool needle felted cacti you can make yourself, perfect as pin cushions, or for your felting needles. Plus, they promise to never exhibit any unpredictable or inexplicable signs of fading away, ensuring endless crafting enjoyment.

Just like always, I put a ton of effort into the design phase, crafting projects that I’m sure you’ll fall in love with. I enjoy passing on the techniques I’ve picked up since 2013, and I’m meticulous about choosing the perfect wool and fibers for each piece. It took me about six tries to get the cacti design just right! So, rest assured knowing that every time you start a new project, you’ve got top-notch materials lists and instructions to guide you along. Go ahead and dive into your crafting adventures with confidence – puns included!

YOU WILL NEED

  • CORE WOOL
  • WHITE AND GREEN CARDED WOOL
  • WOOLTOPS FOR FLOWERS – VARIOUS COLOURS
  • WHITE WOOL TOP FOR SPIKES
  • 2 X TERACOTTA POTS
  • 1 X WOODEN SKEWER

Download the full pattern

WATCH THE VIDEO TUTORIAL

Ready To Start Needle Felting? You will love these as well!

Want to Start needle felting today?

Instantly download a needle felting pattern and get started straight away! On the hunt for inspiring needle felting patterns? There are patterns for all abilities on the website, from nervous beginners to confident needle felters, there is a pattern and video tutorial for you.


Easy Needle Felted Picture! Learn To Paint With Wool

PAINTING WITH WOOL SEASCAPE

Scroll down for video tutorial.

Make time: 90 minutes

Skill level: Easy

Video Tutorial: Scroll down to follow my step by step video tutorial

If you already have the wool then you can watch the video below.
North Sea Coast is inspired by my Yorkshire upbringing, not far from the coast, and my dear dad with his roots along the Humber. Those of you familiar with the North Sea Coast will know not to expect golden sands and palm trees. The North Sea is moody and has real attitude which is what I have tried to convey in this project; slightly abstract and full of texture! However, this is just my take on it so feel free to add artistic license, and a palm tree or two, if that’s the vibe you want. There’s no rules and it’s your project, not mine, so just go for it!

You will need wool, silk fibres, plant dyed art yarn and embellishments you see in the photographs, as well as a piece of Shetland pure wool felt which will be the base of your picture. DOWNLOAD THE PATTERN HERE
The accompanying video is also available so if you are a complete beginner, or don’t need any wool or fibres, you can felt along with me.  

WATCH VIDEO AND FELT ALONG WITH ME

WHAT IS THE PICTURE SIZE?

It really doesn’t matter. I have used a piece of Shetland pre-felt approximately 25cm x 25cm but have also used a much smaller piece to pop in a frame. I can also see this on the front of a greetings card to sell or just give to the besties in your life. Any piece of flat felt will work as a canvas for your picture, just make sure it has a good amount of wool in it and isn’t just acrylic felt.

Happy Felting!

Ready To Start Needle Felting? You will love reading these as well!

Want to Start needle felting today?

Instantly download a needle felting pattern and get started straight away! On the hunt for inspiring needle felting patterns? There are patterns for all abilities on the website, from nervous beginners to confident needle felters, there is a pattern and video tutorial for you.

Needle Felted Macarons In 15 Minutes

These needle felted Macarons will be the most fabulous calorie free cakes you have ever had. My no fail needle felting recipe will have you filling plates and making summer garlands in no time. Each macaron takes a mere 15 minutes to make and all you need are a few scraps of wool and a bucketful of enthusiasm!

It is the perfect needle felting project to kick back and relax with and, if you are a nervous beginner, then this super easy needle felting project has your name all over it. Just imagine a few garlands of these beauties swinging in the summer breeze. The perfect garden party décor and wouldn’t they look brilliant with my bumble bee garland? Video tutorials for both are below.

Happy Creating!

YOU WILL NEED:

  • Scraps of carded wool
  • Core wool (optional)
  • Felting needle
  • Felting base

Yummy Macarons

Busy Bees

Needle Felted Mini Bunny

Mini Bunny needle felting video tutorial – for even the most nervous beginners. With supporting printable pattern download on the website.

This is the easiest of easiest needle felting projects, only takes around 30-40 minutes and is just a whole heap of relaxing fun. Whether you are a nervous first time needle felter/crafter, just want to have some relaxing creative fun or want to fill the house with gorgeous handmade bunny decorations, this is a great project. The process and technique for this pattern is really easy and straightforward. Your secret weapon is the BBQ stick you will be using which makes creating the body shape so much easier and super fast. It really is the needle felting tool you never knew you needed but was in your kitchen drawer all the time.

I was surprised how much I enjoyed making these because cute and cartoony normally isn’t my thing. But, it seems I am a cute and colourful convert just because of how relaxing it was and, there’s no denying, those pastel colours are pretty lush. Even as a seasoned needle felter it is incredibly satisfying to complete something quickly and easily, knowing what the end result will be, and then repeating the process again. I was completely focused and really just felted away in quiet contemplation. There is something immensely calming about creating simple projects and repeating a task – part of the human psyche I guess – so much so that I ended up making four of them and will be making more for an Easter garland.

YOU WILL NEED:

  • Needle felting wool – Approx. 5g, any type or colour.
  • Standard felting needle – size 38 is a good all-rounder.
  • Wooden BBQ skewer (or similar) for shaping
  • Felting mat

Click HERE for the downloadable pattern at a special price of just £1.50.

VIDEO TUTORIAL

CLICK FOR PATTERN DOWNLOAD

MORE SPRING/SUMMER MAKES

For more easy spring and Easter makes just follow the link below and grab yourself some more calming creativity.

You can make a needle felted garland in around 90 minutes – including bumble bees – and the bumble bee brooch will take just 30 minutes.

CLICK FOR SPRING/SUMMER MAKES

How To Make Needle Felted Balls

SCROLL TO THE BOTTOM OF THE PAGE FOR VIDEO TUTORIAL

The wool bundle to create this gorgeous garland can be purchased on the LFC website: SHOP HERE

Temperatures are below freezing, the days are still short, we can’t go out anywhere, the shops are shut… but hey, the heating’s on, there’s food in the cupboard, my dog is there for constant cuddles and we have crafts for company. That’ll do me for now.

In an effort to bring some colour into our lives I am stuck on pretty pastels and all things spring at the moment and it doesn’t get more pastel or spring like than this gorgeous Easter garland. It is also a great way to use up any scraps of wool you have in your felt box and, if you have needle felted before, there are always plenty of scraps in your felt box.

TOP TIP FOR PERFECT SHAPES EVERY TIME

So here I am with a little golden nugget of a needle felting tip for almost perfectly firm and round needle felted balls; use a wooden BBQ stick. I have been using one for ages to create even, smooth shapes and discovered – after trying many other techniques – that using said stick is by far the fastest and easiest way to make perfectly shaped felted balls, in just 3 to 4 minutes! Who knew?

This gorgeous garland is so easy to make and, teamed with the needle felted bumble bees (also a breeze to make), you have yourself a beautiful piece of spring décor to brighten even the most dullest of days. The bees also make a great brooch, or pin.

Click HERE for bumble bee tutorial.

TIME TO MAKE

Felt ball: 3 minutes

Bumble Bee: 20 minutes

Felt Ball Garland: 50 minutes (14 balls)

With 3 bumble bees: 2 hours

YOU WILL NEED

1 Small length of wool top or carded wool; mine are approximately 1g (20cm long) but you can make them bigger. Just make sure they weigh approximately the same so your felt balls are all a similar size; unless you prefer odd shaped balls…

2 Felting needle; a size 38 or 36 is best as they are sturdy and less likely to break on the stick

3 Soft felting surface; foam mat, rice filled hessian bag or a piece of flat felt

4 Sewing needle and strong thread to create your garland

Let’s get going!

SCROLL TO THE END IF YOU LOVE A VIDEO TUTORIAL!

1 Select your first piece of wool.

2 Twizzle the end of the wool in your fingers to slightly matt it.

3 Wrap the end firmly around your wooden skewer

4 Continue to wrap the wool around the stick (no need to use your needle yet) and use your thumb and finger to stop it from moving down the stick and becoming too long.

5 Continue until all the wool is wrapped around the stick. TOP TIP: It should be firmly wrapped but also springy to the touch. If it is too firm it will be harder to shape.

6 Start to shape by poking your needle gently into the ends of the wool – avoiding the stick – at a diagonal angle so the needle doesn’t bend. TOP TIP: Keep moving the stick around with your free hand so the shape is even and there are no flattened areas.

7 Repeat for the other end and continue to shape the entire ball until it is quite firm. It won’t be perfectly round yet but that doesn’t matter.

8 Slide off the pointy end of the stick.

9 Continue to firm and shape with your needle. This will also close the hole created by the wooden stick.

10 Finally, roll the ball firmly in your cupped hands (for a few seconds) to create an even round shape and smooth finish.

Once you have enough for your garland string them together with strong cotton. If you are adding bumble bees make sure you push the needle and cotton through the upper part of the bee as they are top heavy and will be upside down when you hang it. Also, it took me longer than I care to admit to work that out. 😳

Hope you enjoyed this and just subscribe at the bottom of the page for instant blog notifications and up-dates. Happy creating 🐝

VIDEO TUTORIAL

CLICK FOR ALL VIDEO TUTORIALS

How To Needle Felt A Cute Penguin – For Beginners

Penguins hold a special charm that transcends seasons, yet their appeal seems to heighten as the winter frost settles in. Delightfully crafted these adorable needle felted penguins embody the essence of joy and make for a delightful and soothing DIY endeavor.

With their simplistic shapes and straightforward needle felting techniques, creating a ‘Waddle’ of these charming creatures becomes a breeze. Indeed, ‘Waddle’ is the fitting term for a group of penguins, and adding these little cuties to your seasonal decor will spark a sense of homemade warmth. Embrace the magic of crafting as you embark on this delightful journey of bringing these beloved creatures to life, adding a touch of cheer to your home throughout the year, but especially during the cosy embrace of winter.

Skill Level – Beginners

YOU WILL NEED

Time to make: 60 minutes

Start needle felting today and download the easy penguin pattern

Felt along with me workshop style below: For video tutorials please visit THE FELT HUB on YouTube and follow the beginner’s series of tutorials to create your basic shapes.

Happy felting!

WATCH THE VIDEO TUTORIAL

In this comprehensive needle felting tutorial, I’ll guide you step by step through the creation of an adorable baby penguin. Whether you’re a seasoned crafter or just dipping your toes into the world of needle felting, this tutorial is perfect for you. I’ll cover everything you need to know, from selecting the right materials to mastering essential needle felting techniques. By the end of this tutorial, you’ll have your very own charming penguin creation to adorn your home or gift to a friend. So grab your felting needles and let’s get crafting!

Subscribe to my YOUTUBE CHANNEL for new tutorial notifications.

MORE GREAT CHRISTMAS DIY PROJECTS YOU WILL LOVE!

  • Fairy Tree Topper
  • Nordic Gnome
  • Pumpkin Gnome
  • Christmas Wreath
  • Sheep Bauble
  • Snowman
  • Winter Wonderland Pumpkins

For needle felting patterns visit the Lincolnshire Fenn Crafts website

How to make easy needle felted animals from simple shapes

Everything you need to know is covered, from needle felting your basic body shape at the start to putting it all together, in simple bite size chunks that will give you the creative confidence to continue with this fabulously addictive craft.

Within each video tutorial, I meticulously dissect the process of needle felting animals, simplifying each step into easily adaptable body shapes that suit the animal you’re crafting. Whether you’re a beginner eager to dive into the world of needle felting, an improver seeking to enhance your skills, or simply someone craving a creative escape, these tutorials are tailored just for you. Designed in a workshop-style format, each video serves as your personal guide, leading you through every stage of your creative journey. Along the way, I share invaluable tips to streamline the process, ensuring efficiency without sacrificing quality.

From mastering the fundamentals of shaping your basic body outline to seamlessly assembling your creation, every aspect is covered. The content is presented in digestible, bite-sized chunks, giving you with the confidence to persist and thrive in this wonderfully addictive craft. Whether you’re crafting a charming penguin or a needle felted hare, these tutorials provide the foundation and encouragement you need to unleash your creativity and bring your projects animals to life. So, grab your felting supplies, settle in, and let’s start needle felting together.

If you are working from one of my NEEDLE FELTING PATTERNS just follow the written instructions alongside the video tutorials.

1 BASIC BODY SHAPE – 12 minutes

2 BASIC HEAD SHAPE – 12 minutes

Learn to master the creation of a basic and simple head shape for your needle felted animals. Achieving a firm shape is essential for the success of your project, serving as the foundation upon which you’ll build the rest of your creation. Through careful guidance and practice, you’ll learn the techniques necessary to craft a head shape that not only looks great but also provides stability and structure to your final piece.

3 BASIC LEG SHAPES – 21 minutes

Welcome to The Felt Hub series of needle felting projects dedicated to helping beginners master the art of needle felting! In this installment, we’ll focus on creating firm legs every time, without the need for wires. Firm legs are crucial for providing stability and balance to your needle felted creations. Whether you’re new to needle felting or looking to refine your skills, this tutorial will guide you through the process step by step, giving you the skills necessary for you to achieve professional-looking results without any hassle.

4 HARE AND FOX EARS – 15 minutes

Crafting needle felted ears is a breeze once you’ve mastered the right technique. With my straightforward needle felting tutorials, you’ll be up and running in no time, ready to bring your creations to life. Whether you’re aiming for petite and perky or large and floppy, you’ll learn how to craft fabulous ears in any shape or size. So, let’s dive in and start felting those adorable ears!

5 SHEEP EARS – 15 minutes

Discover a quick, effortless, and efficient method for crafting charming needle felted sheep ears in just fifteen minutes.

6 FACE DETAILS – 11 minutes

7 SEWING ON BEADS FOR EYES – 8 minutes

8 PUTTING IT ALL TOGETHER – 35 minutes

Now you can create any size and shape you want

Needle Felted Gnome Tutorial

Grab a cuppa and mince pie and get creative with me, You can felt along with me or just watch and save for later. All you need is a handful of wool, any colours or type, and a felting needle. A cocktail stick will come in useful but it’s not essential.

OK, so maybe her attention is more on the mince pie than the needle felted gnome but, she does love wool and loves watching me needle felt. That counts, right?

VIDEO TUTORIAL Scroll down for written tutorial and materials list.

Or watch the live version on my INSTAGRAM IGTV channel or FACEBOOK PAGE

Skill level: Complete beginners – no crafting experience necessary

Time to make: Approximately 30 minutes

You will need:

15g any colour wool top/roving for the body

5g Wool top/roving or carded wool for the hat, in your choice of colour

Pinch of light colour for the nose

2g Wool top/roving, or curly wool for the beard, in your choice of colour

Enthusiasm

If you don’t have any supplies then the Gnome needle felting kit is available on the website.

IMG_8179

Nordic and Scandinavian style decor is so popular and I just love it. What I especially love are the charming Nordic gnomes. You may also see them referred to as Nisse, Tomte and Tonttu. Our house is full of them and they are super easy so here’s a tutorial for you.

If you have never needle felted before or are an experienced felter this is a wonderful way to start and get you in the festive mood. It’s simple and relaxing and so much fun to make.

This is just one style to get you started but there are so many variations that soon, like me, you will be tripping over them. So grab a cuppa, mince pie and some festive cheer and get creating.

1 – Hat: Make this first so the body fits the hat; much easier than trying to fit the hat to the body! You can go as small or tall as you like but this hat, when completed, is approx 20cm. The triangle template measurements are approx; base 10cm (slightly curved) and sides 12cm .

Layer your hat wool on your felting mat and pop your hat template on top of your wool, leaving a few extra centimetres of wool around each side. Top tip: Your wool shouldn’t be too thick but make sure you can’t see the felting mat through it

IMG_8120.JPG
Make sure you can’t see through the wool

2 – ‘Draw’ a line around the triangle with your needle to create a very rough outline

IMG_8121
‘Draw’ around the template

3 – Remove template and draw around the line a couple more times. This will be your fold line.

IMG_8122
Make sure your line is visible

4 – Fold in the sides one at a time and start to felt to create a triangle; it will be a very rough shape to start with but you will tidy this up as the wool becomes more felted so stop fiddling with it!

IMG_8124
Stop at the fold line

5 – Gently fold and felt each side until you have this rough shape; keep the excess at the top of your triangle because this is going to create your lovely pointy hat shape.

IMG_8125.JPG
Repeat for all three sides

6 – Gently pull away from the base you are using, turn and repeat. Tip; any felting base will do (foam, rice bag etc), whatever your preference.

IMG_8126.JPG
Keep turning regularly so it doesn’t stick to the base

7 – Keep repeating the process until it starts to firm up.

IMG_8128.JPG
Continue felting until it holds its shape

8 – Time to tidy up the shape; use your finger to fold in the sides that need straightening (doesn’t have to be perfect). Be slow and careful so as not to stab your finger; you can use a finger guard but I find they just annoy me. However, I have lots of customers who get on with them just fine.

IMG_8131
Be careful, the needle is sharp

9 – Your approx finished triangle which should be soft but firm and holds its shape.

IMG_8133
Your finished hat shape; it doesn’t have to be perfect

10 – Fold in half and felt along the side to mesh the fibres together. Keep turning and repeating until the hat is now firmly felted along the side so it doesn’t pull apart when you gently pull it.

IMG_8136.JPG
Fold in half and felt along the seam
IMG_8134.JPG

11 – Open up the base of the hat and tidy up the line by folding in any rough edges and felting. Keep turning and felting until you are happy with the shape at the base of your Tomte hat.

IMG_8140

12 – Roll just the top 2/3 cm of your hat between the palm of your hands to firm up the top and point. This improves the look as well as allowing you to tip the point over to the side at a jaunty angle.

IMG_8147.JPG
Roll the tip in the palm of your hands to create a pointy hat
Use any colours you want for the hat

Basic Body Shape

Body shapes don’t get much easier than this. Don’t be too precious about needle marks and dimples because most of this will be covered by its big beard.

1 – Roll your wool (I have used natural white Shetland) into a basic barrel shape. It will do this automatically as you start to roll. Start with less than you need and build it up.

Most important! Do not start to felt with your needle until you have rolled at least half of it really tightly; trust me, this will save you a lot of felting time and applies to all body shapes made this way!

IMG_8253

2 – Start stabbing all over with your needle (mind your fingers) as you continue to roll and remember to keep it tight. Tip: Check to see if your hat sits on top and if the body is too small add some more wool and felt again. If it’s too big then continue to felt where the hat will sit to reduce the size.

IMG_8254

3 – Continue to turn and felt until you have a more even and neater shape. You may end up with a narrower end which is fine because you will pop the hat onto this. Pay particular attention to the base which needs to be flat for stability. Tip; you can also press on the base once felted as the wool is pretty malleable.

IMG_8256

4 – Flatten the base until it sits without wobbling.

IMG_8257

5 – Pop on your hat and felt, gently, all around the edge until it is felted securely onto the body making sure the hat seam is at the back.

IMG_8154
IMG_8157

6 – Make the nose by rolling a pinch of white or flesh coloured wool in your hands just to rough it up. Place on your mat and continue to felt with your needle, turning all the time. Now place back into the palm of your hands and roll vigorously until really firm and smooth. Tip; you may have to do this a couple of times to get it right as it is very easy to add too much wool and have a huge nose if you have never needle felted before. Less is always more when it comes to needle felting.

7 – Place the nose on its side, just under the front of the hat and felt the end into the body.

IMG_8160

9 – As you do this the nose will naturally rise into its correct position. Continue to felt around the base until it is firmly attached. The base of the hat should be sat just above the nose.

IMG_8161

10 – Decide what type of beard you are going to have. I have used grey Jacob but use whatever colour you wish. Curly locks also look really great.

IMG_8163

11 – If using a straight wool pull off a small section and fold in half and start by felting it onto the body just under the nose. Don’t worry about it being longer than the body because you will trim it to size (or not) once it is attached.

IMG_8164
IMG_8166

12 – Continue to felt along the fold and attach it up the side of the nose and along the hat line. Tip; you can push the wool under the hat line with your needle (don’t bend it or  you may break the needle) for a neater finish.

IMG_8167
IMG_8169

13 – Now trim your beard to your desired shape and style. I like mine quite ‘raggy’ so once I have got the length I then snip into the sides.

IMG_8171
IMG_8177

There you have it. One fabulous Tomte Christmas gnome! You can crease the hat or keep it straight. I like both. Told you it was easy!

IMG_4121.JPG

Try different wool and add some fabulous locks for a different look. For the gnomes below I have used a lush teal batting with green silk fibres for the hat, and plant dyed, hand spun locks for the beard. The gnome on the right has a beard of grey Masham shot through with white silk.

But why would you stop there when the variations and colours are endless!

Gnome needle felting kits are also available on the Lincolnshire Fenn Crafts website.

CLICK FOR GNOME NEEDLE FELTING KIT

Needle Felted Pumpkins In 30 Minutes – Easy Video Tutorial

There is no denying that Autumn is my absolute favourite time of year. I have just enough time to pause and take a deep breath before the busy season is upon me. In fact, my Autumn mode usually starts at the beginning of August, when you can just about smell the change of season. So, what better way to kick off the season than with a perfect pumpkin project. It is so easy and you can go from wool to pumpkin in just 30 relaxing minutes.

Scroll down for the video tutorial.

YOU WILL NEED:
15g core wool for a medium sized pumpkin: approx 15cm.
10/15g wool batting sheet or wool top in any colour you like.
Contrasting wool colour: For pumpkin lines.
OPTIONAL: Embellishments: Wool locks, silk fibres, discarded jewellery, lace, ribbon etc

PUMPKIN NEEDLE FELTING KITS are available HERE on the Lincolnshire Fenn Crafts website.

I promise that pumpkins are one of the easiest things to needle felt so, even if you are the most nervous of beginners, I have every confidence of your pumpkin success! For those of you lucky enough to have beautiful weather this Autumn you can really make an outside impact, whether that be on tables or porches, with a ‘pile’ of pumpkins. Trust me when I say that you will soon be plonking pumpkins on every surface! They really are that addictive!

If you are lucky enough to have fabulous autumnal weather you can create a beautiful garden display.

Why not grab some friends or family members and have yourself a pumpkin party. Even if you are socially distancing you can have an amazing creative gathering through Skype, Zoom or other social media outlets that I know absolutely nothing about???

Don’t hold back with the colour or embellishments. Just fly in the face of tradition and have some creative fun!

Pumpkins are not just for Fall and Autumn so why not give them a Winter wonderland feel and enjoy them for even longer. I am in love with these Winter pastels and mine will be staying up right through Christmas.

Gnomes and pumpkins are a match made in heaven and my go to quick and easy projects if I need to just chill and relax. If you have been following my Nordic Gnome tutorial you will already know that gnomes are as easy as pumpkins to make.  I CAN’T WAIT, TAKE ME TO GNOME TUTORIAL

Hopefully I have given you enough ideas to inspire your Autumn/Fall creativity so, just grab a felting needle and whatever is in your wool stash! Most important, it doesn’t matter what you make as long as you are creating something that makes you happy whilst doing it.

Click HERE to view pumpkin kits.

VIDEO TUTORIAL

Are you ready for more needle felting projects?

TAKE ME TO THE GNOME TUTORIAL

or

Visit website for: GNOME NEEDLE FELTING KIT

More fun than you can……. well, shake a gnome at. Happy creating!

How to make your own curls for needle felted sheep

So you have spent hours making your fabulous needle felted sheep, only to realise you don’t have any curls to finish it. Grrrr! Not to worry, just grab a ball of wool, yarn or similar and make your own. It’s really easy and creates a whole new look for your needle felted animals; Scroll down for video tutorial.

It is also very calming and saves you sitting by the post box like this, impatiently waiting for your curly wool to arrive.

VIDEO TUTORIAL

Here is a quick video (part 2) showing you how easy it is. I have used a coarse rug yarn but any yarn with an element of wool in it will do.

Use any yarn you have in your craft box; It is easier to apply if it has some wool content. I have used a coarse rug yarn and a really soft Merino for these two gorgeous sheep.

Create beautiful texture with standard yarn

You will also find out how to add this lush, art yarn (video part 1) to your projects. I used a 40 triangle needle as it is a little easier but a standard (usually a 36 or 38 gauge) will do just fine.

Video part 1 – Art yarn application

Sheep needle felting kits using this fabulous art yarn are available on the Lincolnshire Fenn Crafts website

Happy creating. Sandy x