Make your creative dreams come to life with free needle felting tutorials, downloads, tips, ideas, and inspiration. Start your needle felting journey today!
Well almost ‘ultimate’, I’m not the oracle, but I have been needle felting since 2013 so I know quite a lot about needle felting wool, and it’s a pretty decent guide, even if I do say so myself.
It’s quite special and I spent many hours putting it together so, to access it you need to be part of the Facebook live workshop and events group, or a member of the VIP Felt Club news letter. It is just another way of being part of the LFC (Lincolnshire Fenn Crafts) creative community where I am on a mission to get as many people as possible involved in this amazing craft. Both groups are completely free to join and, to access the guide just enter your password, or find it in the Facebook group topics section.
Please note that this is for personal use only. Do not share anywhere online, in groups or on social media.
It’s completely free and when you join the needle felting and free workshops group you will benefit from exclusive access to my free live workshops, all in one place, including all previous workshops. I hope this group will inspire and develop your needle felting confidence (whatever level you are at) and encourage others to get involved, in a more private space. You will also be able to comment and share your WIP creations during and after the live workshops and ask for help and support from myself or other members.
Join The Needle Felting Group And Watch Free Live Workshops
Plus so much more! Whilst the group will be primarily for live workshops events and updates, I will also be dropping in with some impromptu live sessions sharing needle felting techniques, quick wins and ideas. You can also drop into the group anytime to access all the tutorials in one place as each will be available to view after the event. It’s pretty busy in there some come meet the flock and put the next live workshop date in your diary.
P.S Click below to join. It’s completely free and a great way to enjoy some creative community in a more private space! Let’s start 2022 as we mean to go on? Creatively! 💗
Apart from being the most joyful craft ever invented, needle felting is utterly versatile and allows you to create the most simple or complex sculptures with handful of loose wool and a barbed* needle. This is simply done by stabbing the wool repeatedly with the felting needle, shaping until it meshes the wool fibers together creating a firm object.
*They actually have notches but most sites describe them as barbed so that is what I will refer to them as… I will discuss needle sizes and their uses on another page.
CREATE PERFECT PETALS AND EASY NEEDLE FELTED FLOWERS IN NO TIME AT ALL!
The Origin of Needle Felting: Felt is strong and its origins go back to the 1950’s when industrial size felting machines were invented to produce on a much larger scale for many items such as: car and instrument dampers, piano keys, insulation, polishers etc. However, needle felting as a craft is hugely popular and the craft world has been taken by storm by this addictive way to express ourselves creatively.
IS NEEDLE FELTING FOR ME?
Do you want to try a wonderfully addictive craft that has no limits, perfect for absolute beginners and beyond? Are you a first time crafter who’s really nervous of trying something new, but yearning to unlock your creativity and be inspired?
Do you enjoy a laid-back approach to crafts and are you looking for an affordable, no fuss, no sew craft or, craving creative ‘me’ time away from the noise and stresses of daily life?
If your answer was yes to any of the above then needle felting is for you. All you really need is enthusiasm!
DON’T FORGET TO JOIN THE FELT HUB ON FACEBOOK
Become part of the creative community and enjoy free live needle felting workshops!
NEEDLE FELTING ISN’T HARD, BUT STARTING A NEW CRAFT CAN SOMETIMES FEEL A LITTLE DAUNTING
When someone tells me they can’t needle felt, or tried and failed, I can say with absolute confidence that it has nothing to do with ability. In fact, the two most common reasons why people fail at needle felting is lack of confidence and trying to run before they can walk. I really hope after reading this you will be able to start your needle felting journey with a newfound confidence, and enthusiasm.
ENTHUSIASM – It’s all you need to get started; if you have that then you are 75% of the way there. The other 25% is learning the basics first. Once you have done that (and it doesn’t take long at all) you can then start to build towards (in a realistic way) those wonderful projects you have seen on Pinterest. Nobody shows up anywhere with a set of skills already in place, be it learning a new language, instrument, crafts etc. Almost everything we do has to be learned, and practiced to become proficient. Think back to when you learned to tie your shoe laces. It seemed so hard at the time, but soon you didn’t need to think about it. Needle felting is no different, in-fact it’s easier because there are no tricky patterns, or awkward knots to fathom.
DON’T SET UNREALISTIC EXPECTATIONS OF YOURSELF – Do you know of anyone who has achieved anything without some degree of effort. More to the point, what would be the point in starting out at the top of our game. As humans are programmed to set goals, strive to improve ourselves. Imagine what a boring world it would be if we all suddenly woke up to find we could get to the top of Mount Everest, be proficient at guitar playing, build a house, type a hundred words a minute…
START WITH THE BASICS– The best way to start is with simple shapes that will become part of a whole. In just an hour – yes, you heard that right – you will be able to learn how to create simple shapes, use your felting needle, and attach parts together to complete a project. This hare is one of my most popular beginners projects. Click the button below to learn how to needle felt simple shapes; the start of your felting journey.
TOP TOP TIP – ALLOW YOURSELF TO BE A BEGINNER! It’s often hard to find your confidence when you start needle felting, even harder if you haven’t done any crafting before, so tackling those fears is the first hurdle. The second hurdle is finding a good tutorial and materials guide that will give you the best chance of success. I can help with both of those things but you have the most important job, and that’s allowing yourself to be a beginner. And, as sure as eggs is eggs, if you don’t allow yourself a period of ‘learning’ grace you are setting yourself to fail. In fact, you have to get it wrong in order to succeed and believe me, when it comes to needle felting success comes very quickly.
FEAR OF FAILURE – TIME TO CHANGE THE NARRATIVE
We are, so often, our own worst critics, and we use it as self preservation technique so we don’t have to start something i.e. a new craft. We literally talk ourselves out of it before we have even tried. It is like a fail safe but it can be very self destructive. So, time to change the narrative and, when you think to yourself, ‘I’ve failed’ simply change the statement to ‘I have learned’, and see how that self doubt just falls away. Each time you do this your confidence will grow, as will your skill set. Changing the mindset, that makes you way too hard on yourself, is the most important thing you will learn when it comes to starting a new craft, and that confidence will also find its way into many other aspects of our life.
This Calla Lily looks so realistic you would think it had taken months of practice. Not so! It is made using very simple techniques that any beginner can manage. If you fancy trying it then click below to watch the free tutorials and grab the materials list.
We often spend so much time worrying what others will say and, the truth is, they will probably be super impressed that you are learning a new skill. If not then the problem is probably their own self confidence and lack of courage to try something new themselves. Ask yourself who you are doing it for? The answer should always be you! If you really struggle then don’t show your felt creations to anyone until you feel ready, and then not at all if that is how you feel.
CRAFTS ARE SUPPOSED TO BE FUN…
Always remember, you are doing this for you and no one else. Crafts are all about you, and the enjoyment of just making, so try and loose yourself in those creative moments.
NEVER COMPARE YOURSELF TO OTHERS!
Be realistic and always remember that they started off exactly the same way as you…as a complete beginner! If you are on chapter 1 and they are chapter 5 then it’s hardly a fair comparison, and it’s a sure fire way to ruin your day, and knock your confidence at the same time. Find your needle felting feet, learn the basics well, then start to look for inspiration. Also, it is completely normal to think ‘I will never be able to make that’. Honestly, time and practice will change your mind.
DON’T UNDERESTIMATE THE MENTAL HEALTH BENEFITS OF CRAFTS
Anxiety, loneliness, isolation and depression have never been more prevalent than they are in today’s society, and with good reason; a global pandemic, climate change, rising prices, job insecurity, fear for our kids, caring for others, the list goes on and on… But, amidst all of that, the world is still full of great people and creativity. If we just prescribed ourselves some craft therapy on a regular basis then everything will feel calmer, more grounded, safer. And, if that is just for the time you are involved in something that distracts you from the daily stresses and strains it will allow you to go about your day in a much better state of mind.
IT DOESN’T MATTER WHAT YOU DO AS LONG AS YOU DO IT
If not needle felting then a jigsaw, sewing, growing house plants, gardening, reading, knitting, colour by numbers, in fact anything that requires your undivided attention. Even though it can be hard it is so important to create a little time to focus on yourself, even if only for half an hour. And fortunately needle felting is incredibly portable so, if you can’t find a quiet space or the household won’t leave you alone, I have often found the loo to be a good alternative. As I said, needle felting is very portable 😉
ARE YOU READY TO START NEEDLE FELTING NOW?
Let’s get going. The video tutorial below is an introduction to creating a really simple shape that will become the most important technique you will learn when first starting needle felting. It can be made in just 5-10 minutes and will act as the structure, or scaffolding for the rest of your project. My tutorials are very workshop style and are the nearest thing to one of my in person classes. Simplicity and speed are the cornerstone of all my tutorials and I am always looking for new techniques to help improve your needle felting journey as well as give you the confidence to fall in love with this craft as much as I have. I have added links for the playlist that will teach you how to complete hares, sheep, mice, foxes, badgers, gnomes and too many to mention, with ease. You just need to be enthusiastic and willing to learn.
Click HERE for my quick do’s and don’ts guide to needle felting.
NEEDLE FELTING VIDEO TUTORIALS – BEGINNERS PLAYLIST
MAKE ALL THE NEEDLE FELTED THINGS!
Needle felted hares and sheep are always popular for beginners, needle felted gnomes and pumpkins can be made in just 30 minutes, and why not rustle up a macaron or two in just 15 minutes! Needle felting ideas and tutorials are endless so checkout the menus at the top of the page and make all the needle felted things!
Using a BBQ skewer, or chop stick, as a needle felting tool makes many needle felting projects a whole lot easier, and faster to complete. It is also a great aid for creating symmetry, especially when it comes to legs and feet. It is the tool that no self respecting needle felter should be without, whether it’s your first needle felting project or your twentieth. Even better, you will probably find one, or both, at the bottom of your kitchen drawer, along with the sandwich toaster and vegetable juicer…
IT’S SUCH AN EASY PROJECT!
This gnome on a stick is easy to make and the solid hat means you can really go to town on the embellishments without spoiling the shape. Simple embroidery adds another creative and effective element. Time to make: 60-90 minutes. Beginners and perfectionists add on another 30 minutes.
Needles are sharp so keep your fingers out of the way. If in doubt, use finger protectors. Not suitable for young children and older children should be supervised at all times.
When working around your stick avoid hitting the wood with your needle as it could break. Working at a diagonal angle will help avoid this.
Keep the wool firm as you wrap, using thin lengths of wool, and take your time to build it into a cone shape. If your wool is too bulky you will struggle to get a nice smooth shape.
If you start to loose the shape, simply unwind a little wool and do it again.
Enjoy yourself and, if it’s your first project, go easy on yourself; you are only on chapter 1 so don’t compare yourself to others who are on chapter 5.
There is no end to the style of gnomes you can create and how gorgeous are these visions in pink and raspberry! I love the impact created by these simple embroidered snowflakes against the bold raspberry colour.
EMBROIDERED SNOWFLAKES
Embroidered snowflakes are super simple! Just thread a large needle with yarn and criss cross four straight lines until you have a seven pointed star. They can also be needle felted on.
TOP TIP: Keep the yarn loose so as not to sistort the shape of the snowflake.
HAT AND BODY
1 Wrap your wool around the stick and felt into place
2-4 Continue to wrap and felt until you have covered half of your stick, longer if you want a bigger hat.
5-6 Continue to wrap and felt to secure
7 Continue to build the shape but don’t take the wool to the tip bas you want to create a cone shape.
8-9 Create your shape along the stick by using your needle at a diagonal angle.
10 Widen the base as you felt; mine is approx. 6cm diameter
11-12 Create the body the same way but aim for a barrel shape approx. 6cm in height, slightly narrower at the top and wider at the base for stability.
13-14 Remove from the stick and continue to shape and firm
15 Create a cavity at the base of the hat for the body to sit in.
16 Narrow the top, if necessary, by felting at a diagonal angle from the top towards the base.
17-18 Pop some fresh wool on the top of the body and felt into the hat.
19-20 Now felt through the hat and into the top of the body, until it is held firmly.
NOSE
21 Wrap the end of a small piece of wool firmly around your wooden skewer, aiming for a short oval shape.
22 Continue to wrap the wool around the stick (no need to use your needle yet) and use your thumb and finger to stop it from moving down the stick and becoming too long. Felt a little to secure but leave the ends slightly loose. TOP TIP: Don’t forget to keep it tight as this will create a great shape. Make it any size you want.
23 Check you are happy with the size and shape.
24 Remove from the stick and felt each side (where you left the wool loose) just under the brim of the hat.
25 It needs to be a good size as it will soon disappear under the beard, so if it’s too small it will look lost.
BEARD
26-28 Felt the beard wool or locks just under the brim of the hat. This will keep it looking neat.
29 Add in more colour if you want to.
30-31 You can create a beard at the front or, as I have done, create a full skirt all the way around the hat.
Et voila! Leave it simple or add embellishments. I have wrapped wool yarn around this one and created a loose pom pom at the top. Now go forth and make more gnomes; it would be rude not to and they always look better in twos, threes, fours…😉
Craft your own seasonal happy space with a needle felted pumpkin or two, or three, or fill the whole house (as I do) with these glorious DIY projects that will take us into autumn/fall and beyond.
Make pumpkins with personality using carded wool or wool tops
Scroll down for video tutorials
I am a firm believer that pumpkins are absolutely not just for Halloween and I have you covered with three pumpkin tutorials that will take you right through September to December and Christmas. Yes, of course there’s a Christmas pumpkin!
If you are nervous about starting needle felting then this is the project for you!
Not only are they fabulous needle felting project but, they are also one of the quickest and easiest needle felting projects to make, taking a mere 30 minutes! They will add instant impact to any room, and are impressive seasonal gifts for friends and loved ones and, If the weather permits, they look wonderful on an outside dining table or strung as a garland from a tree or deck.
Keep it simple or go for all out bling and glamour. Go traditional or opt for a style that the cast of Frozen would be envious of. Whatever your style, there really is a needle felted pumpkin for everyone and no needle felting experience necessary; just a few needle felting supplies and a big dollop of enthusiasm.
There are three video tutorials to choose from – traditional, fire and ice and winter wonderland – and you could have all three made in just 90 minutes!
I have popped a materials list above each one but these are just suggestions and anything goes. Don’t worry if you haven’t any carded wool as there is also a tutorial using wool tops. See I told you I have you covered!
Happy creating and I would love to see your pumpkin photos to add to the community gallery. You can email them to me at: info@lincolnshirefenncrafts.com or send them to me via my FaceBook page.
Do you need wool or supplies?
Links for kits, wool and needles are also below or SHOP WEBSITE
Hi and welcome to my ultimate guide to needle felting.
I’m Sandy, creator, owner, designer, chief cook and bottle washer at Lincolnshire Fenn Crafts.
Since 2014 I have taught thousands of people to needle felt through my tutorials, videos, workshops and extensive range of inspiring needle felting kits. Whether you are a nervous beginner or a confident crafter, you will discover a wealth of needle felting guides and resources at your creative fingertips. Let’s craft a happy space together!
SO, WHAT DO YOU NEED TO START NEEDLE FELTING?
Not much at all as it happens and you don’t have to spend a lot of money either! It’s a budget friendly hobby that requires very little space and zero experience and all you need is:
1 FELTING WOOL
2 FELTING NEEDLE
3 FELTING MAT
4 GOOD TUTORIALS
5 ENTHUSIASM
FELTING WOOL
Wool tops or carded wool are both great to needle felt with. Avoid Merino wool tops and go for a coarser wool like Jacob, Shetland or Romney.
CLICK HERE FOR MY ULTIMATE WOOL GUIDE AND QUICK LOOK, HANDY CHART
FELTING NEEDLES
Just one or two standard felting needles will get you started. I like to use a 38 star as a good all-rounder.
You will need a foam, hessian, or wool mat. A piece of firm foam is what many people use but there are other mats you can try. I tend to use a mixture depending on the project.
Ignore all the fancy needle felting creations you see online and start with a simple needle felting project or tutorial. It is so important to allow yourself to be a beginner and build up to those fancy creations you have been drooling over.
When it comes to needle felting enthusiasm goes a long, long way! It’s all you need to get started; you don’t need to be artistic, just enthusiastic. Allow yourself to be a beginner and you will pick up the needle felting basics in no time. You may prefer to start with a needle felting kit , especially if you don’t have any equipment. It is a budget friendly way to get started and allows you to see if you enjoy this fabulous craft without ending up with lots of equipment.
Helping you create perfectly shaped, firm needle felted projects that a more experienced needle felter would be proud of!
Your ears have pricked up now, haven’t they? Well, I have used ALL the needle felting tools over the years and I still end up using just a handful on a regular basis. However, a few years ago I discovered the magic of the humble BBQ skewer and it changed the way I needle felted?
Now, to some of you this will be old news but to many, especially those new to needle felting, it will become a revelation! A needle felting epiphany of sorts, and you will wonder how you ever managed without it, even though it was sat in your kitchen draw the whole time. Even better, total cost, only a few pence or cents, assuming you bought them as a multi-pack.
The BBQ skewer is, to needle felters what string is to farmers and, once discovered, you will use it as your go to felting tool. It will give you the confidence to try new styles that you may be finding tricky with your current technique. You can also use any wool, be it carded or wool tops.
For instance, the legs , head and body of this fabulous hare (link for tutorial below) have all been made around a BBQ skewer, and not a wire in sight! And, believe me, those legs are long! Wherever possible I like to work without wire so this works well for me. Even when I use wire for animals it is usually just for the legs, and maybe the neck. That said, if you are working much bigger then you will find using wires really helps form and stability.
What this magical wooden stick allows you to do is to create perfect symmetry for your legs in super fast time. They end up really firm so no floppy, saggy legs (not a good look) and no need for wire. Making firm, perfectly shaped heads is a dream and lengthening and tapering the body shape is a breeze.
From hedgehog noses to Christmas trees, gnomes, mushrooms, cactus, bumble bees and bunnies… the list of things you can create is endless, and even the snail shell was made around the skewer. Mind boggled yet?
Make super fast and simple balls, bunnies and bees. Felted balls only take 3 minutes and these little projects are perfect for using scraps of wool. Now it really is boggled isn’t it? 😮
Now go and dig out your BBQ skewers and have some needle felting fun. If you can’t find them they will probably be at the bottom of your kitchen drawer, covered in a sticky substance of unknown origin 🤢
Become a VIP Felt Club member! It’s free and you will receive a free needle felting pattern, lifetime discount code, exclusive early access to new product launches and promotions, as well as notification of new tutorials and live needle felting workshops!
I adore this season in my garden, eagerly anticipating the possibility of my 19-year-old Cordyline blooming for the third time. The wait for this magnificent plant to flower, starting as a humble shrub, has been considerable, but the aroma it emits is simply divine—reminiscent of Jasmine with subtle notes of caramel.
MAKE YOUR OWN NEEDLE FELTED PLANTS
With plants and gardening at the forefront of my thoughts, I’ve designed a selection of super cool needle felted cacti you can make yourself, perfect as pin cushions, or for your felting needles. Plus, they promise to never exhibit any unpredictable or inexplicable signs of fading away, ensuring endless crafting enjoyment.
Just like always, I put a ton of effort into the design phase, crafting projects that I’m sure you’ll fall in love with. I enjoy passing on the techniques I’ve picked up since 2013, and I’m meticulous about choosing the perfect wool and fibers for each piece. It took me about six tries to get the cacti design just right! So, rest assured knowing that every time you start a new project, you’ve got top-notch materials lists and instructions to guide you along. Go ahead and dive into your crafting adventures with confidence – puns included!
Instantly download a needle felting pattern and get started straight away! On the hunt for inspiring needle felting patterns? There are patterns for all abilities on the website, from nervous beginners to confident needle felters, there is a pattern and video tutorial for you.
Mini Bunny needle felting video tutorial – for even the most nervous beginners. With supporting printable pattern download on the website.
This is the easiest of easiest needle felting projects, only takes around 30-40 minutes and is just a whole heap of relaxing fun. Whether you are a nervous first time needle felter/crafter, just want to have some relaxing creative fun or want to fill the house with gorgeous handmade bunny decorations, this is a great project. The process and technique for this pattern is really easy and straightforward. Your secret weapon is the BBQ stick you will be using which makes creating the body shape so much easier and super fast. It really is the needle felting tool you never knew you needed but was in your kitchen drawer all the time.
I was surprised how much I enjoyed making these because cute and cartoony normally isn’t my thing. But, it seems I am a cute and colourful convert just because of how relaxing it was and, there’s no denying, those pastel colours are pretty lush. Even as a seasoned needle felter it is incredibly satisfying to complete something quickly and easily, knowing what the end result will be, and then repeating the process again. I was completely focused and really just felted away in quiet contemplation. There is something immensely calming about creating simple projects and repeating a task – part of the human psyche I guess – so much so that I ended up making four of them and will be making more for an Easter garland.
YOU WILL NEED:
Needle felting wool – Approx. 5g, any type or colour.
Standard felting needle – size 38 is a good all-rounder.
Wooden BBQ skewer (or similar) for shaping
Felting mat
Click HERE for the downloadable pattern at a special price of just £1.50.
See the full range of needle felting kits, punch needle kits, accessories and handmade items over at the WEBSITE
Meet the family. Well, some of them…
Over 40 carefully and lovingly designed needle felting kits to choose from. Each kit is a complete starter kit and so, contains everything you need including detailed instructions, lots of colour photographs, an actual size template as your size guide, quality wool (mostly British) and everything you need to complete each project. Kits are suitable for absolute beginners and advanced beginners.
No sewing. No wires. No glue. No stuffing. Open the box and get started… All you need to add is a little patience and enthusiasm!
There is an array of felting mat options out there so I have put together a video tutorial (below) showing you my favourite mats and best practice for using them. If you are using different felting techniques then you, like me, will probably use a combination of two or three; there is no one size fits every project.
I have also just invested in some Eco needle felting mats which can be used on their own, on top of your foam pad or hessian mat. They are fabulously thick 100% wool felt made here in the UK and the feedback has been great! I love mine and use it all the time now.
Use on its own…
or on top of your foam block
If you use it on top of your foam mat you will rarely, if ever need to replace your foam block. They are completely biodegradable but honestly, it will be a long time before they need replacing.
Hessian rice mats are particularly useful for needle felting pictures or any other flat felting, like big hare ears, flowers, gnome hats, wings etc. It also works brilliantly with the 7 needle multi tool which will have you powering through your flat needle felting projects.
Punch needle multi tool
MAKE YOUR OWN HESSIAN RICE MAT
You can easily make your own mat from a piece hessian filled with dried rice or similar. I used an old hessian shopping bag for my first one. Just make sure the weave is quite tight otherwise it won’t last long at all and always use a piece of felt on the top to protect the surface. This will easily 10 x the life of your rice mat.
1 Cut out twice the size of the area you want to work on
3 Sew up all four sides, leaving a two inch gap to fill with rice.
3 Fill with dried rice or similar
4 Sew up the gap securley
5 Slap a bit of felt on top and you are good to go!
Hessian filled with dried rice
Hope this helps and remember, there is no right or wrong choice. Much of it is personal preference and the type of needle felting project you are working on.
If you like to see it done just scroll to bottom for video tutorial!
I was a couple of years into needle felting before I tried a reverse felting needle and now I wouldn’t be without it. The special effects you can create are endless and super cool, taking your needle felting to a different level. A reverse needle does exactly what it says and instead of felting and compressing the wool it pulls the already felted wool back out, creating dramatic, or subtle effects. It adds instant character to a project and is simple and easy to use.
I love the subtle effect it created on top of the head of the head of this moon gazing hare, giving it a dreamy fuzziness.
Look at the subtle effect atop the head of this moon gazing hare
I use two sizes of needle; 32 and 40 gauge. As with standard felting needles, the higher the number the finer the needle and the more subtle the effect.
I have used the size 32 most recently (although a size 40 would have done the job just as well), on my bee brooches to create the fuzzy body and eyebrows. I also used a contrasting white core for more effect and visibility.
When I made this brooch the eyes looked a little lost so I used the reverse needle just above the eyebrow to pull out some of the core white wool.
I repeated on the other eye then trimmed it back. As you can see, the effect is great and those eyes really pop!
Trim to your preferred length
I wanted to create a similar effect all over the body to create that lovely fuzzy effect. Repeatedly use the reverse needle until you have pulled all the lovely wool through then trim quite short to create a neat finish that allows the white and dark to compliment each other.
When I decided to needle felt my first pig I really wanted to create the coarse top layer you see on a lot of pigs that sits on the peachy skin. I used a Romanov wool core but any coarse dark will do; grey Jacob is perfect and one of my favourites. It created exactly the look I was aiming for using a 32 reverse needle.
There’s no limit to what you can use it on and I think the hedgehogs were crying out for a reverse felting needle makeover. I know you can get the realistic spikes but this was much more fun. I created a grey Jacob core with a brown Shetland carded top and went at it quite fiercely with a 32 reverse needle. You can watch the full hedgehog tutorial HERE
See how I have picked up the grey I pulled through plus a little of the brown. Give it a twizzle for instant spikiness and a gorgeous ‘Prickle’ of hedgehogs; yes that is the actual collective noun for a group of hedgehogs. My heart… 🦔
So, there you have it. Just a few of the cool things you can do with a reverse felting needle. Experiment on your own projects and just have some fun with it. Happy felting!
SCROLL TO THE BOTTOM OF THE PAGE FOR VIDEO TUTORIAL
The wool bundle to create this gorgeous garland can be purchased on the LFC website: SHOP HERE
Temperatures are below freezing, the days are still short, we can’t go out anywhere, the shops are shut… but hey, the heating’s on, there’s food in the cupboard, my dog is there for constant cuddles and we have crafts for company. That’ll do me for now.
In an effort to bring some colour into our lives I am stuck on pretty pastels and all things spring at the moment and it doesn’t get more pastel or spring like than this gorgeous Easter garland. It is also a great way to use up any scraps of wool you have in your felt box and, if you have needle felted before, there are always plenty of scraps in your felt box.
TOP TIPFOR PERFECT SHAPES EVERY TIME
So here I am with a little golden nugget of a needle felting tip for almost perfectly firm and round needle felted balls; use a wooden BBQ stick. I have been using one for ages to create even, smooth shapes and discovered – after trying many other techniques – that using said stick is by far the fastest and easiest way to make perfectly shaped felted balls, in just 3 to 4 minutes! Who knew?
This gorgeous garland is so easy to make and, teamed with the needle felted bumble bees (also a breeze to make), you have yourself a beautiful piece of spring décor to brighten even the most dullest of days. The bees also make a great brooch, or pin.
1 Small length of wool top or carded wool; mine are approximately 1g (20cm long) but you can make them bigger. Just make sure they weigh approximately the same so your felt balls are all a similar size; unless you prefer odd shaped balls…
2 Felting needle; a size 38 or 36 is best as they are sturdy and less likely to break on the stick
3 Soft felting surface; foam mat, rice filled hessian bag or a piece of flat felt
4 Sewing needle and strong thread to create your garland
Let’s get going!
SCROLL TO THE END IF YOU LOVE A VIDEO TUTORIAL!
1 Select your first piece of wool.
2 Twizzle the end of the wool in your fingers to slightly matt it.
3 Wrap the end firmly around your wooden skewer
4 Continue to wrap the wool around the stick (no need to use your needle yet) and use your thumb and finger to stop it from moving down the stick and becoming too long.
5 Continue until all the wool is wrapped around the stick. TOP TIP:It should be firmly wrapped but also springy to the touch. If it is too firm it will be harder to shape.
6 Start to shape by poking your needle gently into the ends of the wool – avoiding the stick – at a diagonal angle so the needle doesn’t bend. TOP TIP: Keep moving the stick around with your free hand so the shape is even and there are no flattened areas.
7 Repeat for the other end and continue to shape the entire ball until it is quite firm. It won’t be perfectly round yet but that doesn’t matter.
8 Slide off the pointy end of the stick.
9 Continue to firm and shape with your needle. This will also close the hole created by the wooden stick.
10 Finally, roll the ball firmly in your cupped hands (for a few seconds) to create an even round shape and smooth finish.
Once you have enough for your garland string them together with strong cotton. If you are adding bumble bees make sure you push the needle and cotton through the upper part of the bee as they are top heavy and will be upside down when you hang it. Also, it took me longer than I care to admit to work that out. 😳
Hope you enjoyed this and just subscribe at the bottom of the page for instant blog notifications and up-dates. Happy creating 🐝
Everything you need to know is covered, from needle felting your basic body shape at the start to putting it all together, in simple bite size chunks that will give you the creative confidence to continue with this fabulously addictive craft.
Within each video tutorial, I meticulously dissect the process of needle felting animals, simplifying each step into easily adaptable body shapes that suit the animal you’re crafting. Whether you’re a beginner eager to dive into the world of needle felting, an improver seeking to enhance your skills, or simply someone craving a creative escape, these tutorials are tailored just for you. Designed in a workshop-style format, each video serves as your personal guide, leading you through every stage of your creative journey. Along the way, I share invaluable tips to streamline the process, ensuring efficiency without sacrificing quality.
From mastering the fundamentals of shaping your basic body outline to seamlessly assembling your creation, every aspect is covered. The content is presented in digestible, bite-sized chunks, giving you with the confidence to persist and thrive in this wonderfully addictive craft. Whether you’re crafting a charming penguin or a needle felted hare, these tutorials provide the foundation and encouragement you need to unleash your creativity and bring your projects animals to life. So, grab your felting supplies, settle in, and let’s start needle felting together.
If you are working from one of my NEEDLE FELTING PATTERNS just follow the written instructions alongside the video tutorials.
1 BASIC BODY SHAPE – 12 minutes
2 BASIC HEAD SHAPE – 12 minutes
Learn to master the creation of a basic and simple head shape for your needle felted animals. Achieving a firm shape is essential for the success of your project, serving as the foundation upon which you’ll build the rest of your creation. Through careful guidance and practice, you’ll learn the techniques necessary to craft a head shape that not only looks great but also provides stability and structure to your final piece.
3 BASIC LEG SHAPES – 21 minutes
Welcome to The Felt Hub series of needle felting projects dedicated to helping beginners master the art of needle felting! In this installment, we’ll focus on creating firm legs every time, without the need for wires. Firm legs are crucial for providing stability and balance to your needle felted creations. Whether you’re new to needle felting or looking to refine your skills, this tutorial will guide you through the process step by step, giving you the skills necessary for you to achieve professional-looking results without any hassle.
4 HARE AND FOX EARS – 15 minutes
Crafting needle felted ears is a breeze once you’ve mastered the right technique. With my straightforward needle felting tutorials, you’ll be up and running in no time, ready to bring your creations to life. Whether you’re aiming for petite and perky or large and floppy, you’ll learn how to craft fabulous ears in any shape or size. So, let’s dive in and start felting those adorable ears!
5 SHEEP EARS – 15 minutes
Discover a quick, effortless, and efficient method for crafting charming needle felted sheep ears in just fifteen minutes.
Mastering the technique of adding depth and dimension to these tiny features can elevate your creations from good to exceptional. And, achieving this level of realism is easier than you might think!
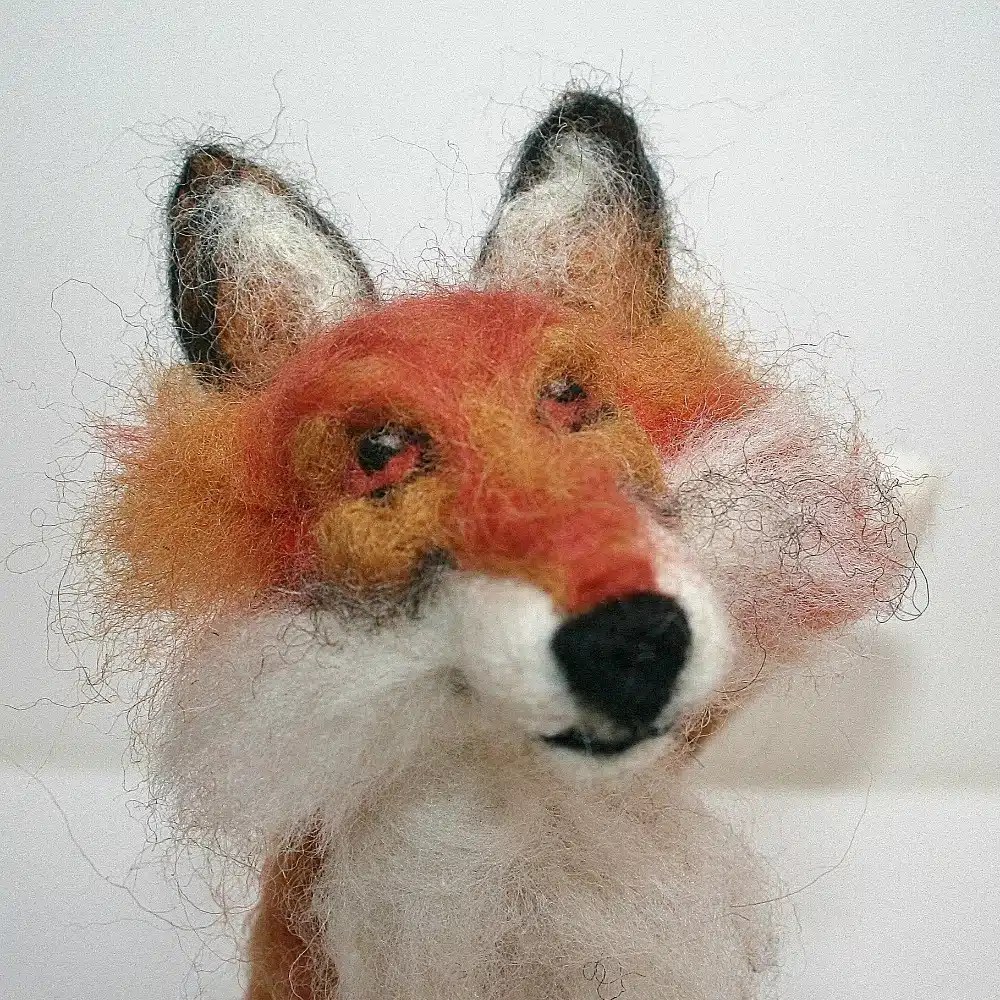
One effective method to enhance the realism of your needle felted animal eyes is by focusing on the eyebrows. By simply incorporating a small seed shape of wool above the eye and gently felting it into place, you can create subtle yet impactful changes. This addition not only adds dimension but also brings the eyes to life, making them pop.
The beauty of this technique lies in its versatility. Whether you prefer a subtle enhancement or a more dramatic effect, adjusting the size and shape of the eyebrow wool allows you to tailor the outcome to your liking, and project. Experimenting with different styles and blending colors can yield fascinating results, allowing you to customise your creations and infuse them with personality.
Take, for example, the fox eyebrows showcased here. Also, by blending lighter and slightly darker hues, we prevent them from blending into the face and ensure they stand out. This simple yet effective tip can make a world of difference, transforming your needle felted animals into captivating projects.
So, the next time you embark on a needle felting project, don’t overlook the importance of the eyes. With a little creativity and attention to detail, you can breathe life into your needle felting projects. Experiment, explore, and let your imagination guide you – the results may surprise you!
Roll a small piece of wool into a seed shape by rolling in the palm of your hand with your forefinger
Gently felt in place just above the eye
START NEEDLE FELTING TODAY!
If you already have the needle felting wool and tools you can quickly download from a range of 60 different patterns HERE
ARE YOU A COMPLETE BEGINNER TO NEEDLE FELTING?
Then you will love these tutorials to help you get started with confidence: