Make your creative dreams come to life with free needle felting tutorials, downloads, tips, ideas, and inspiration. Start your needle felting journey today!
FILL YOUR HOME WITH SEASONAL ‘HANDMADE BY YOU’ JOY
Tis the season to get creative and, whatever your seasonal style I have a Christmas craft project to suit. From cute and quirky, to stylish and minimal. It’s all here, on the blog, completely free, and all you have to do is fill your seasonal stockings full of inspiration, grab your wool and needles, and get felting. And of course, ten times better than shop bought and made with love by you.
There are so many great seasonal ideas on this page you won’t know where to start. From Nordic gnomes giving you all the hygge feels, cute snowmen, baa-ble tree decorations, super stylish wreaths and garlands, to forest fairy tree toppers. There’s a felting project to suit every taste, even Christmas pumpkins. Proof, if ever needed, that pumpkins are not just for Halloween. And it has to be said, these cool winter wonderland pumpkins wouldn’t look out of place on the set of a Disney movie.
From stylish wreaths and garlands to quirky gnomes, there’s a project for every age and ability!
Check out the fabulous felting projects below, and make your holiday season merry and bright!
VIDEO TUTORIALS
The Felt Hub on YouTube is full of seasonal creativity. Just click on any of the photos below and you can felt alongside me, workshop style
SHOP NEEDLE FELTING KITS TOOLS AND ACCESSORIES
My needle felting kits have been inspiring creativity since 2014 and, if you are finally ready to take the needle felting plunge then you will find everything you need on the WEBSITE or over at ETSY
SKILL LEVEL
When it comes to these tutorials and kits, they are for all abilities. Allowing you to make your project as difficult, or intricate as you like. Keep it simple if you are just starting and build your skills. But once you have one project under your crafty belt there will be no stopping you. However, be warned, it is a highly addictive craft so be prepared to loose hours, maybe even days to this amazing hobby.
WANT SOMETHING LESS SEASONAL?
Just pop over to the home page HERE and take your pick from the drop down menus. You will find this blog is packed to the rafters with free needle felting tutorials, from learning basic shapes to more advanced projects. There are even free patterns and downloads for you to try.
BE A VIP! It’s completely free and you will receive a free, super easy, needle felting pattern, lifetime discount code, exclusive early access to new product launches and promotions, as well as notification of new tutorials and live needle felting workshops.
So, what are you waiting for? It’s time to get cosy with crafts so just grab your wool, felting needles, a big dose of enthusiasm, and maybe a glass of something nice. Cheers and happy festive felting!
FILL YOUR HOME WITH HANDMADE NEEDLE FELTED DECORATIONS
As soon as Autumn arrives I am already full-blown, pumpkin spice latte sweater dresses and jumper mode. It is my absolute favourite time of year as we start to hibernate and get really creative, filling our homes with cosy homemade fall and autumn décor! Without doubt, nothing says it better than pumpkins filling the rooms of your home, especially the ones you have made yourself, and there is no better time than now to grab a cuppa, and start creating with me.
MAKE A NEEDLE FELTED GNUMPKIN WITH ME
Make time: 90 minutes (20 minutes for the pumpkin)
It is full on pumpkin season, or should I say Gnumpkin season. Basically, it is a pumpkin, gnome hybrid but, and I am sure you will agree, they are a match made in heaven. It is my absolute favourite needle felting project at the moment, and I love it more because it can stay up as part of your DIY Christmas décor. This one has a full on Autumnal flavour but I am already making one in cool winter colours.
NO CRAFT OR DRAWING SKILLS NEEDED
This super easy needle felting tutorial will have you creating your own needle felted Gnumpkin in no time at all! Making needle felting easy is what it is all about, and you don’t need any craft or drawing skills. This step by step needle felting tutorial will help build your creative confidence, whilst teaching you all the needle felting basics, and no sewing, I promise! My easy techniques tips and hacks will have you felting in no time!
DO YOU NEED THE WOOL OR FELTING KIT?
If you have just started needle felting, kits are an especially great way to get started so you can get a real feel for a new craft. In addition to this, you are only spending a small amount to get going. The website is full of inspiring kits and inspiration for every ability.
The pumpkins alone are really fabulous but let’s take it up a notch and turn it into this super stylish, Gnumpkin. In addition, the full video tutorial is at the bottom of the page – my easy step, by step, felt along with me guide. I had so much fun designing and making these, and I know you are going to love it just as much!
NEEDLE FELTED PUMPKIN
This forms the body of the gnome and is one of the easiest ever needle felting projects; you can make one of these in just 20 minutes, even complete beginners. Scroll to the bottom of the page for the video tutorial.
MAKE THE PUMPKIN BODY FIRST
LET’S GET STARTED – YOU WILL NEED:
Carded needle felting wool and wool tops – Felting needle – Felting mat – Wooden BBQ skewer or similar; this makes creating shapes so much easier.
1 Lay a handful of core wool on your felting mat and create a rough bread roll shape with your hands. With your free hand start to felt with your needle.
2 Continue the process until your wool retains its size and shape. TIP: It needs to be secure but very soft.
TIME TO ADD THE CARDED WOOL BATTING
3 Sit your shape on top of your piece of wool batting and start to wrap the batting sheet around it, pulling towards the centre of, what will be, the bottom of your pumpkin.
4 Felt the batting into the centre of the wool until it holds. Continue the process until all the core wool is covered and pull away any excess. Tip: White patches are fine as they add contrast
5 Pumpkin ready for shaping, smooth side up.
6 Using your felting needle ‘draw’ a clearly defined line around the entire pumpkin, starting from middle centre and finishing where your line started.
7 Repeat until your pumpkin is divided into eight sections.
8 Take a long, thin piece of contrasting wool top and felt securely into the lines you have just created. Again, work from centre top and finish where you started, leaving any loose strands. TIP: Any loose strands can be trimmed for neatness, but also look good as decoration. Your pumpkin is ready. Time to make a Gnumpkin.
MAKING THE PERFECT GNOME HAT
I tried a few techniques before deciding which one would give me the best result in the most simple way. I found using the trustee wooden skewer allowed me to create the perfect cone shape that didn’t flop around. The needle felted acorn is the perfect finishing touch and only takes minutes to make.
WATCH THE VIDEO TUTORIALS BELOW
GNUMPKIN VIDEO TUTORIAL
PUMPKIN VIDEO TUTORIAL
ACORN VIDEO TUTORIAL
Last but not least, learn how to add a super seasonal acorn to your Gnumpkin hat; the cherry on the cake so to speak.
Save to your Pinterest board for a daily dose of Pinspiration.
DO YOU LOVE A CREATIVE COMMUNITY? JOIN THE FELT HUB ON FACEBOOK
Join me on Facebook. It’s completely free and you will have access to live workshops, free patterns, downloads, and so many more resources, all in one place. A group created inspire, nurture, and develop your needle felting confidence (whatever level you are at), in a more private space.
This is one of the easiest needle felting projects you can make. These gorgeous needle felted pumpkins are utterly addictive and make for some really show stopping Autumn/Fall décor! Imagine having these plump beauties dotted around the house, made into garlands, or given as gifts to only your best friends.
HAVE A PUMPKIN CRAFT PARTY
They are so much fun and so easy, why not have a craft party and needle felt the afternoon away. Imagine how many of these you could make in just a couple of hours, and more fun than you can shake a witches broomstick at.
VIDEO TUTORIAL
You will find my step by step video tutorials at the bottom of this page Make time: 20 minutes
1 Roll a small handful of core wool into a very rough ball and felt to hold in place. This will only take a minute as you need to keep it soft; this is what helps create the pumpkin shape.
2 Wrap a thin piece of carded batting around the core wool and felt at the base.
TOP TIP: Don’t cover up any patches as this will enhance the finished look once you add a second layer
3 Continue to felt the wool batting towards the centre and pull away any excess. Sit it ‘bottom’ down on your mat and check the shape.
4 Working from the top to the bottom, repeat the previous step with a different colour, making sure it is pulled thin enough for the base layer to show through.
CREATING SEGMENTS
5 Lay a very thin piece of wool top across the centre of your pumpkin and felt to secure. Wrap it quite tightly around your pumpkin and felt the two ends together at the base.
TOP TIP: The base won’t be visible so you can felt really firmly. Pulling it tightly around the pumpkin creates the ‘segments’.
6 Continue as in the previous step until you have eight distinct segments. Because the core was left really soft you now have a very obvious pumpkin shape.
7 Work gently around your pumpkin with your felting needle and tidy up any loose, untidy, or lumpy sections. It needs to look good from all sides, but don’t worry too much about the base as it won’t be seen.
8 Create a stem for your pumpkin
1 Blend a little wool together2 Roll firmly and felt into a rough stem shape, keeping the end loose3 Roll firmly in your hands to firm and shape4 Continue to felt, flatten the top, and narrow the base
9 Felt the loose wool (at the narrow base) into the centre of your pumpkin. feel free to add any embellishments. I have added a lovely crochet leaf which really finishes it off. You could also add curly locks and different fibres, or acorns.
I hope you really loved this tutorial. For more pumpkin tutorials click HERE If you want to felt alongside me, workshop style, just click on the video links below.
Improve your needle felting techniques and add a needle felted chicken to your creative menu. Calorie and guilt free but hours of fun! You will also learn how to needle felt a perfectly smooth finish; the Holy Grail of needle felting
The key to this project is getting a good shape and perfectly smooth finish and I am going to show you exactly how to achieve it, with easy step by step instructions and more photographs than you can shake a tail feather at.Suitable for confident beginners and more experienced needle felters.
Join me for this easy needle felted gnome craft project. Felt alongside me and create this beautiful gnome in a hoop, which is so much fun to make and beyond cute. It is such a simple needle felting project, made easy by my step by step needle felting tips and techniques. I will also show you how to make the easiest needle felted hearts, without a cookie cutter! You can adapt it to your own style, using whatever felting wool you have to hand, keeping it simple or embellish the heck out of it. Materials list and video tutorial is below and it only takes around 90 minutes from start to finish, and imagine this as a beautiful homemade Valentine’s gift… 💜
This gorgeous project could just as easily be made on a piece of felt (just as in the tutorial) and popped in a lovely frame. It would look so lovely as a cushion design, or sew the finished project onto a jacket or bag. The options are endless so don’t be afraid to experiment, and swap the colours to suit.
So don’t be nervous. Starting a new craft can be exciting but also a little confusing. Needle felting is no different and the array of wool, tools and accessories can send you into a confusing tailspin.
The truth is, you don’t need a lot to get started with needle felting, and it is also a budget friendly hobby. That is until you become addicted, which you will, and then no amount of felting wool will ever be enough!
That’s why I always recommend a needle felting starter kit to get you going, so you can test the needle felting waters. They are inexpensive and have absolutely everything you need to complete each project from start to finish. It avoids you feeling overwhelmed and helps to build your creative confidence. All you have to do is open the box and add enthusiasm.
MY TOP 5 FELTING KIT RECOMMENDATIONS
Here are my top 5 recommendations for beginners kits. They all come beautifully boxed and are perfect for storing your supplies! No sewing, no tricky patterns and they take just a few hours of your time! They also use our gorgeous British wool, carefully selected for its excellent needle felting properties.
Complete stunner and he knows it! This, along with the Herdwick Sheep, is the most popular beginners kit. It is such fun to make and you can follow the instructions to the letter, or add your own touches. As well as detailed instructions you can felt along on YOUTUBE by following the beginners playlist.
My favourite sheep from the Lake District is an ever popular needle felting kit. Great for building your needle felting confidence, this super kit will soon have you warmed up and ready for your next project. As well as detailed instructions you can felt along on YOUTUBE by following the beginners playlist.
A gorgeous little project that has enough wool to make two of our favourite UK garden birds. A perfect project to create with your bestie or, one for you and one to give away. There is also a great video tutorial HERE showing you how easy it is to create a perfect wing shape without the need for a cookie cutter.
What’s not to love with this design? Even better, you can change the markings to represent your own four legged friend. As well as detailed instructions you can felt along onYOUTUBE by following the beginners playlist.
If you are looking for a home for the wee little fairies and forest dwellers, then this is right up your street. Lot’s of different techniques and a great needle felting kit for beginners. Any self respecting gnome or fairy would be thrilled to have the keys to this house! As well as detailed instructions you can felt along to the video tutorial HERE
WANT TO KNOW MORE ABOUT NEEDLE FELTING?
Join the THE FELT HUB with Lincolnshire Fenn Crafts
NEEDLE FELTING ISN’T HARD, BUT STARTING A NEW CRAFT CAN SOMETIMES FEEL A LITTLE DAUNTING
When someone tells me they can’t needle felt, or tried and failed, I can say with absolute confidence that it has nothing to do with ability. In fact, the two most common reasons why people fail at needle felting is lack of confidence and trying to run before they can walk. I really hope after reading this you will be able to start your needle felting journey with a newfound confidence, and enthusiasm.
ENTHUSIASM – It’s all you need to get started; if you have that then you are 75% of the way there. The other 25% is learning the basics first. Once you have done that (and it doesn’t take long at all) you can then start to build towards (in a realistic way) those wonderful projects you have seen on Pinterest. Nobody shows up anywhere with a set of skills already in place, be it learning a new language, instrument, crafts etc. Almost everything we do has to be learned, and practiced to become proficient. Think back to when you learned to tie your shoe laces. It seemed so hard at the time, but soon you didn’t need to think about it. Needle felting is no different, in-fact it’s easier because there are no tricky patterns, or awkward knots to fathom.
DON’T SET UNREALISTIC EXPECTATIONS OF YOURSELF – Do you know of anyone who has achieved anything without some degree of effort. More to the point, what would be the point in starting out at the top of our game. As humans are programmed to set goals, strive to improve ourselves. Imagine what a boring world it would be if we all suddenly woke up to find we could get to the top of Mount Everest, be proficient at guitar playing, build a house, type a hundred words a minute…
START WITH THE BASICS– The best way to start is with simple shapes that will become part of a whole. In just an hour – yes, you heard that right – you will be able to learn how to create simple shapes, use your felting needle, and attach parts together to complete a project. This hare is one of my most popular beginners projects. Click the button below to learn how to needle felt simple shapes; the start of your felting journey.
TOP TOP TIP – ALLOW YOURSELF TO BE A BEGINNER! It’s often hard to find your confidence when you start needle felting, even harder if you haven’t done any crafting before, so tackling those fears is the first hurdle. The second hurdle is finding a good tutorial and materials guide that will give you the best chance of success. I can help with both of those things but you have the most important job, and that’s allowing yourself to be a beginner. And, as sure as eggs is eggs, if you don’t allow yourself a period of ‘learning’ grace you are setting yourself to fail. In fact, you have to get it wrong in order to succeed and believe me, when it comes to needle felting success comes very quickly.
FEAR OF FAILURE – TIME TO CHANGE THE NARRATIVE
We are, so often, our own worst critics, and we use it as self preservation technique so we don’t have to start something i.e. a new craft. We literally talk ourselves out of it before we have even tried. It is like a fail safe but it can be very self destructive. So, time to change the narrative and, when you think to yourself, ‘I’ve failed’ simply change the statement to ‘I have learned’, and see how that self doubt just falls away. Each time you do this your confidence will grow, as will your skill set. Changing the mindset, that makes you way too hard on yourself, is the most important thing you will learn when it comes to starting a new craft, and that confidence will also find its way into many other aspects of our life.
This Calla Lily looks so realistic you would think it had taken months of practice. Not so! It is made using very simple techniques that any beginner can manage. If you fancy trying it then click below to watch the free tutorials and grab the materials list.
We often spend so much time worrying what others will say and, the truth is, they will probably be super impressed that you are learning a new skill. If not then the problem is probably their own self confidence and lack of courage to try something new themselves. Ask yourself who you are doing it for? The answer should always be you! If you really struggle then don’t show your felt creations to anyone until you feel ready, and then not at all if that is how you feel.
CRAFTS ARE SUPPOSED TO BE FUN…
Always remember, you are doing this for you and no one else. Crafts are all about you, and the enjoyment of just making, so try and loose yourself in those creative moments.
NEVER COMPARE YOURSELF TO OTHERS!
Be realistic and always remember that they started off exactly the same way as you…as a complete beginner! If you are on chapter 1 and they are chapter 5 then it’s hardly a fair comparison, and it’s a sure fire way to ruin your day, and knock your confidence at the same time. Find your needle felting feet, learn the basics well, then start to look for inspiration. Also, it is completely normal to think ‘I will never be able to make that’. Honestly, time and practice will change your mind.
DON’T UNDERESTIMATE THE MENTAL HEALTH BENEFITS OF CRAFTS
Anxiety, loneliness, isolation and depression have never been more prevalent than they are in today’s society, and with good reason; a global pandemic, climate change, rising prices, job insecurity, fear for our kids, caring for others, the list goes on and on… But, amidst all of that, the world is still full of great people and creativity. If we just prescribed ourselves some craft therapy on a regular basis then everything will feel calmer, more grounded, safer. And, if that is just for the time you are involved in something that distracts you from the daily stresses and strains it will allow you to go about your day in a much better state of mind.
IT DOESN’T MATTER WHAT YOU DO AS LONG AS YOU DO IT
If not needle felting then a jigsaw, sewing, growing house plants, gardening, reading, knitting, colour by numbers, in fact anything that requires your undivided attention. Even though it can be hard it is so important to create a little time to focus on yourself, even if only for half an hour. And fortunately needle felting is incredibly portable so, if you can’t find a quiet space or the household won’t leave you alone, I have often found the loo to be a good alternative. As I said, needle felting is very portable 😉
ARE YOU READY TO START NEEDLE FELTING NOW?
Let’s get going. The video tutorial below is an introduction to creating a really simple shape that will become the most important technique you will learn when first starting needle felting. It can be made in just 5-10 minutes and will act as the structure, or scaffolding for the rest of your project. My tutorials are very workshop style and are the nearest thing to one of my in person classes. Simplicity and speed are the cornerstone of all my tutorials and I am always looking for new techniques to help improve your needle felting journey as well as give you the confidence to fall in love with this craft as much as I have. I have added links for the playlist that will teach you how to complete hares, sheep, mice, foxes, badgers, gnomes and too many to mention, with ease. You just need to be enthusiastic and willing to learn.
Click HERE for my quick do’s and don’ts guide to needle felting.
NEEDLE FELTING VIDEO TUTORIALS – BEGINNERS PLAYLIST
MAKE ALL THE NEEDLE FELTED THINGS!
Needle felted hares and sheep are always popular for beginners, needle felted gnomes and pumpkins can be made in just 30 minutes, and why not rustle up a macaron or two in just 15 minutes! Needle felting ideas and tutorials are endless so checkout the menus at the top of the page and make all the needle felted things!
See the full range of needle felting kits, punch needle kits, accessories and handmade items over at the WEBSITE
Meet the family. Well, some of them…
Over 40 carefully and lovingly designed needle felting kits to choose from. Each kit is a complete starter kit and so, contains everything you need including detailed instructions, lots of colour photographs, an actual size template as your size guide, quality wool (mostly British) and everything you need to complete each project. Kits are suitable for absolute beginners and advanced beginners.
No sewing. No wires. No glue. No stuffing. Open the box and get started… All you need to add is a little patience and enthusiasm!
Penguins are the best at any time of year, but even more so when the Winter chill sets in. These cute needle felted baby penguins are great fun and an easy and relaxing project, using simple shapes and needle felting techniques. Just imagine your house filled with a ‘Waddle’ of penguins; yes, that really is the name for a group of penguins.
If you don’t have wool and needles you can order the complete penguin needle felting starter kit over at the Lincolnshire Fenn Crafts WEBSITE.
Happy felting x
Skill level: Easy
Time to make: 60 minutes
Subscribe to my YOUTUBE CHANNEL for new tutorial notifications
LIVE WORKSHOP 19TH DECEMBER 6PM GMT
Also, don’t forget I am holding a live workshop on Saturday over on my Facebook page. It’s free and will be 90 minutes of joyful , festive creativity. Plus, you will be able to ask me all your needle felting questions. Full details and link below; it would be lovely to see you there! Click photo for Facebook notifications.
Grab a cuppa and mince pie and get creative with me, You can felt along with me or just watch and save for later. All you need is a handful of wool, any colours or type, and a felting needle. A cocktail stick will come in useful but it’s not essential.
OK, so maybe her attention is more on the mince pie than the needle felted gnome but, she does love wool and loves watching me needle felt. That counts, right?
VIDEO TUTORIAL Scroll down for written tutorial and materials list.
Nordic and Scandinavian style decor is so popular and I just love it. What I especially love are the charming Nordic gnomes. You may also see them referred to as Nisse, Tomte and Tonttu. Our house is full of them and they are super easy so here’s a tutorial for you.
If you have never needle felted before or are an experienced felter this is a wonderful way to start and get you in the festive mood. It’s simple and relaxing and so much fun to make.
This is just one style to get you started but there are so many variations that soon, like me, you will be tripping over them. So grab a cuppa, mince pie and some festive cheer and get creating.
1 – Hat: Make this first so the body fits the hat; much easier than trying to fit the hat to the body! You can go as small or tall as you like but this hat, when completed, is approx 20cm. The triangle template measurements are approx; base 10cm (slightly curved) and sides 12cm .
Layer your hat wool on your felting mat and pop your hat template on top of your wool, leaving a few extra centimetres of wool around each side. Top tip: Your wool shouldn’t be too thick but make sure you can’t see the felting mat through it
Make sure you can’t see through the wool
2 – ‘Draw’ a line around the triangle with your needle to create a very rough outline
‘Draw’ around the template
3 – Remove template and draw around the line a couple more times. This will be your fold line.
Make sure your line is visible
4 – Fold in the sides one at a time and start to felt to create a triangle; it will be a very rough shape to start with but you will tidy this up as the wool becomes more felted so stop fiddling with it!
Stop at the fold line
5 – Gently fold and felt each side until you have this rough shape; keep the excess at the top of your triangle because this is going to create your lovely pointy hat shape.
Repeat for all three sides
6 – Gently pull away from the base you are using, turn and repeat. Tip; any felting base will do (foam, rice bag etc), whatever your preference.
Keep turning regularly so it doesn’t stick to the base
7 – Keep repeating the process until it starts to firm up.
Continue felting until it holds its shape
8 – Time to tidy up the shape; use your finger to fold in the sides that need straightening (doesn’t have to be perfect). Be slow and careful so as not to stab your finger; you can use a finger guard but I find they just annoy me. However, I have lots of customers who get on with them just fine.
Be careful, the needle is sharp
9 – Your approx finished triangle which should be soft but firm and holds its shape.
Your finished hat shape; it doesn’t have to be perfect
10 – Fold in half and felt along the side to mesh the fibres together. Keep turning and repeating until the hat is now firmly felted along the side so it doesn’t pull apart when you gently pull it.
Fold in half and felt along the seam
11 – Open up the base of the hat and tidy up the line by folding in any rough edges and felting. Keep turning and felting until you are happy with the shape at the base of your Tomte hat.
12 – Roll just the top 2/3 cm of your hat between the palm of your hands to firm up the top and point. This improves the look as well as allowing you to tip the point over to the side at a jaunty angle.
Roll the tip in the palm of your hands to create a pointy hat
Use any colours you want for the hat
Basic Body Shape
Body shapes don’t get much easier than this. Don’t be too precious about needle marks and dimples because most of this will be covered by its big beard.
1 – Roll your wool (I have used natural white Shetland) into a basic barrel shape. It will do this automatically as you start to roll. Start with less than you need and build it up.
Most important! Do not start to felt with your needle until you have rolled at least half of it really tightly; trust me, this will save you a lot of felting time and applies to all body shapes made this way!
2 – Start stabbing all over with your needle (mind your fingers) as you continue to roll and remember to keep it tight. Tip: Check to see if your hat sits on top and if the body is too small add some more wool and felt again. If it’s too big then continue to felt where the hat will sit to reduce the size.
3 – Continue to turn and felt until you have a more even and neater shape. You may end up with a narrower end which is fine because you will pop the hat onto this. Pay particular attention to the base which needs to be flat for stability. Tip; you can also press on the base once felted as the wool is pretty malleable.
4 – Flatten the base until it sits without wobbling.
5 – Pop on your hat and felt, gently, all around the edge until it is felted securely onto the body making sure the hat seam is at the back.
6 – Make the nose by rolling a pinch of white or flesh coloured wool in your hands just to rough it up. Place on your mat and continue to felt with your needle, turning all the time. Now place back into the palm of your hands and roll vigorously until really firm and smooth. Tip; you may have to do this a couple of times to get it right as it is very easy to add too much wool and have a huge nose if you have never needle felted before. Less is always more when it comes to needle felting.
7 – Place the nose on its side, just under the front of the hat and felt the end into the body.
9 – As you do this the nose will naturally rise into its correct position. Continue to felt around the base until it is firmly attached. The base of the hat should be sat just above the nose.
10 – Decide what type of beard you are going to have. I have used grey Jacob but use whatever colour you wish. Curly locks also look really great.
11 – If using a straight wool pull off a small section and fold in half and start by felting it onto the body just under the nose. Don’t worry about it being longer than the body because you will trim it to size (or not) once it is attached.
12 – Continue to felt along the fold and attach it up the side of the nose and along the hat line. Tip; you can push the wool under the hat line with your needle (don’t bend it or you may break the needle) for a neater finish.
13 – Now trim your beard to your desired shape and style. I like mine quite ‘raggy’ so once I have got the length I then snip into the sides.
There you have it. One fabulous Tomte Christmas gnome! You can crease the hat or keep it straight. I like both. Told you it was easy!
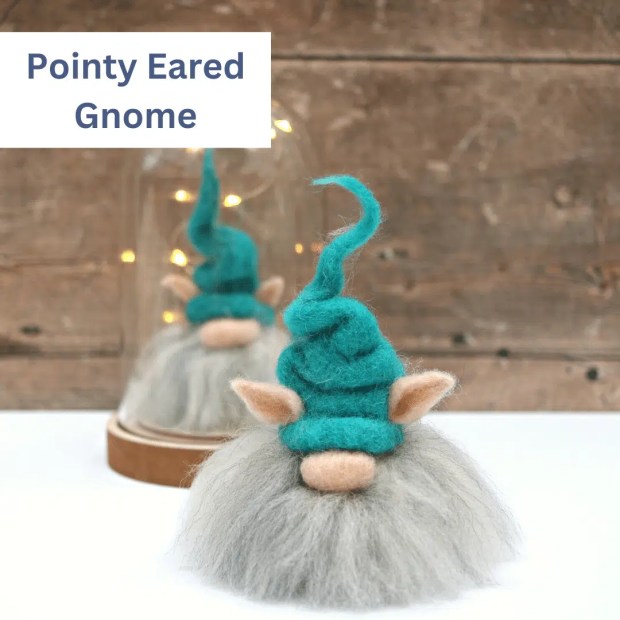
Try different wool and add some fabulous locks for a different look. For the gnomes below I have used a lush teal batting with green silk fibres for the hat, and plant dyed, hand spun locks for the beard. The gnome on the right has a beard of grey Masham shot through with white silk.
But why would you stop there when the variations and colours are endless!
So you have spent hours making your fabulous needle felted sheep, only to realise you don’t have any curls to finish it. Grrrr! Not to worry, just grab a ball of wool, yarn or similar and make your own. It’s really easy and creates a whole new look for your needle felted animals; Scroll down for video tutorial.
It is also very calming and saves you sitting by the post box like this, impatiently waiting for your curly wool to arrive.
VIDEO TUTORIAL
Here is a quick video (part 2) showing you how easy it is. I have used a coarse rug yarn but any yarn with an element of wool in it will do.
Use any yarn you have in your craft box; It is easier to apply if it has some wool content. I have used a coarse rug yarn and a really soft Merino for these two gorgeous sheep.
Create beautiful texture with standard yarn
You will also find out how to add this lush, art yarn (video part 1) to your projects. I used a 40 triangle needle as it is a little easier but a standard (usually a 36 or 38 gauge) will do just fine.
One of the questions I get asked the most is, “how do I get my legs really firm?” In the needle felting world floppy and saggy legs on your animals are a no, no! They are the finishing touches that add stability and dimension to your animal so don’t spoil it by being impatient and not taking the time it needs to get it right (approx 10 to 15 minutes for each leg). My short, real time video tutorial quickly teaches you how to avoid common needle felting mistakes by showing you the tips and needle felting hacks I have learned along the way. Hope it helps you improve your needle felting skills and remember: You can add wool but not take it away!